3946 stories
·
4 followers

Clarity: AI writing skill and editor

1 Share

Useful

Write for one person you can picture #

A piece written by you, to a specific audience: a specific set of people, at a specific point in their lives, in a specific set of roles. It might be the engineer who's been writing software for three years and now wonders if they're keeping up well enough with AI. It might be you, back when you thought that you'd never write well enough for others to take your words seriously.

This is not hypothetical: you are, right now, writing. So consider that you are making some decisions. What's the best way to explain this stuff? What words should I use? Where should I start? Does this joke land? All these decisions become softer when you write to everyone. You know that you'll be helping someone at one end of the bell curve who needs clarity while frustrating someone at the other end who knows all that stuff already and is missing something subtler. But writing with deliberate direction helps you, and it helps your reader, see which part you need to land on.

Your whole duty as a writer is to please and satisfy yourself, and the true writer always plays to an audience of one.

Strunk & White, The Elements of Style

Know what they bring, and what they need from you #

Underlying both decisions and clarity is this: the reader has something in their head as they sit down to read. Some of it's correct, some of it's stale and outdated and needs replacing, and some of it's a misconception that you're writing to correct.

Throughout a single piece of writing you'll face two different questions: What context does the reader already have? and, crucially, What context does the reader need? The gap between those two answers defines the piece. That is to say, this is the main point where writers of technical material fail in their first draft: they go straight from the question they want to answer to the answer that they want to give, completely bypassing the reader-side question of what the reader actually knows already.

Decide what they take away #

Your piece must center around a single thing. That thing should be stated in a sentence, ideally somewhere close to the beginning. (No, even now, you feel an internal twitch that says "I should start with the bigger picture before getting down to specifics," but just stick with it.) It should be stated in a way that someone could reasonably argue with.

That is to say, the difference is between subject and claim. A subject lets you talk about the subject as fully as you can, but risks slowly drifting away from your topic. A claim invites you to argue; it demands that you persuade.

Every successful piece of nonfiction should leave the reader with one provocative thought that he or she didn't have before. Not two thoughts, or five, just one.

William Zinsser, On Writing Well

Say something only you could say #

Doesn't this apply to everyone? A check you can do on each paragraph is: could this paragraph (nearly) word for word appear in someone else's article on the same subject? If something passes this test, then it's filler, even if it's well made.

What tends to survive the test is your stuff: specific observed details, measured numbers, incidents of which you were a party, lived arguments, changed beliefs.

This is the stuff that can't be borrowed. If your piece isn't full of it, then it's sourceless. It's why writing exists at all. A draft that lacks it has a sourcing problem, not a prose problem.

Make every sentence pay #

Now, try this: each sentence should leave the reader with more than the prior one. Don't repeat the same point in different words. Don't throat-clear.

Most padding is caused not by not having enough to say, but by choosing to make a piece longer than is needed to make your point. The other source is writing that follows someone else's form expectations, such as writing an introduction that introduces nothing and writing a conclusion that concludes nothing.

So cut both causes of padding and move that beautiful, short piece in front of your reader. A short piece that lands beats a long piece that covers.

Clear

Be specific enough to be wrong #

Vague writing can't be verified, so it can't be trusted.

Try to be as specific as you can. Take a sentence like "a dependency that made us vulnerable." It has the grammar of a specific and the content of an abstraction, and it tells the reader nothing that "supply chain risk is real" did not already tell them. The obvious course of action is to name the package, to name the month, and to say how you caught it. When a writer fails to do so, they have written the abstraction with more words.

Prefer the specific to the general, the definite to the vague, the concrete to the abstract.

Strunk & White, The Elements of Style

If you can't think of a verifiable example, then delete it rather than blurring it. If you can't think of a sensible example, then don't invent one, because when you fabricate a detail, you destroy any residual trust.

Put someone in the sentence #

Give people agency. Decisions, cultures, and data don't act; people do.

Sentences like "bad things tend to happen in March" have no human actor. Find a more concrete subject. Try: "Most people find March a difficult month for things to go according to plan." Now you can see who is doing the action.

Use the second-person "you" when no specific person fits. It makes you engage the reader directly.

Use the plain word, and break the long sentence #

Prefer shorter words and sentences rather than longer ones. Short words and single-idea sentences read more easily than long words and sentences that express more than one idea.

A simple style is the result of thorough thinking. Ornate prose often indicates that the writer still doesn't have a clear picture of what they are trying to say.

Simple writing is persuasive. A good argument in five sentences will sway more people than a brilliant argument in a hundred sentences.

Scott Adams

Cut what does no work, then stop #

When editing, flag every passage that you suspect might be superfluous. Then consider whether the piece still works without it. If it does, remove it.

Over-stripping qualifiers yields inhuman prose. True writing contains a certain amount of hedging to reflect the writer's own uncertainty.

Strip qualifiers that hide a claim. Keep those that honestly represent genuine uncertainty.

Say the relation instead of implying it #

Putting two sentences next to each other can create a sense of logical connection between them based only on rhythm. "The benchmark is saturated. The model still fails in production." Is the second sentence the cause of the first, or the consequence? The rhythm implies an answer, and while you are reading it feels like reasoning.

Try to supply the word: because, although, once, where, so that. If you cannot supply it without inventing the relation, then the relation was never there.

Although the benchmark is saturated, the model still fails in production, which means the benchmark has stopped measuring what ships. Adding an explicit connector, such as although, as we did here, turns a mere juxtaposition into a real claim.

Yours

Take a position, and say where it is weak #

Presenting both sides without taking a position isn't balanced. It feels empty, and readers know you are evading.

State your leaning and say what makes you uneasy. Give the strongest real objection its own paragraph near the end. Answer or concede it. Conceding costs you nothing and gains you respect.

The objection has to be one that someone actually holds. Fabricating a weak opponent is as dishonest as inventing a statistic, and readers detect it quickly.

Write the way you would say it #

Read a sentence aloud. If you would not say it to a colleague over lunch, you should not publish it.

This is why contractions, sentence-initial "but," and the first person are appropriate: writing is a transaction between two people, and hiding one of those people discards half the power.

Never say anything in writing that you wouldn't comfortably say in conversation.

William Zinsser, On Writing Well

Do not perform #

Avoid fake erudition or humility, or a voice that sounds rough or as if it were studied.

Making it

Give the first sentence its one job #

Make the reader want to hear the second sentence of the piece.

Effective openings are often a startling fact, a scene-setting description, a number, a provocative claim, or a leading question. A definition of the topic or an explanation of your intent will not work.

Make each paragraph earn the next #

Each paragraph should answer the question the previous one raised or raise the question the next one will answer.

Test your progress by covering the page and seeing if you can predict what will follow. If your headings are doing all the work of organizing your ideas, your writing is merely a list of items that might be arranged in a table of contents.

Stop where the thought stops #

When the point is made, stop.

Bad endings usually result from the writer's summarizing a litany of traps, pitfalls, and opportunities or from his or her offering the quotable line. A good ending often returns to a concrete item or circumstance from the story, states what will carry over, and stops. You may feel that it is abrupt and unfinished, but that is better than vague optimism.

Rewrite by cutting and reordering #

Rewriting always means that you have moved the third paragraph to the top, deleted the proudest section of the first version, and found the true sentence buried inside the one you wrote.

Smoothing is not rewriting. Smoothing turns a rough authentic sentence into a bland one and polishes away the only interesting thing in your draft.

Rewriting is the essence of writing well: it's where the game is won or lost.

William Zinsser, On Writing Well

Read it aloud #

Reread every time before sending.

Your ear catches what a checklist misses: plodding paragraphs, breathless clauses, repetitive sentence shapes; where reading stumbles, the sentence is wrong.

Read the whole story
emrox
43 minutes ago
reply
Hamburg, Germany
Share this story
Delete

Tailcat: Tailscale without Tailscale, by Tailscale

1 Share

Today we’re releasing tailcat, a remix of pieces of Tailscale that gives you a way to use the open-source Tailscale data plane (WireGuard® + NAT traversal + DERP) without the Tailscale control plane, written by the people who made Tailscale. It’s Tailscale without Tailscale, by Tailscale.

Specifically, tailcat is both an open-source Go package and a CLI tool using that package. It lets you run a server-side listener and a client to connect to that server, moving bidirectional bytes back and forth.

That is, it’s like netcat but flowing over Tailscale’s magicsock (WireGuard encryption + NAT traversal + DERP rendezvous/fallback relay).

Notably, tailcat has:

  • no IP addresses
  • no accounts (no logins, no passwords, no SSO)
  • no control plane
  • no users
  • no admins
  • no administrative controls
  • no root or admin OS access requirement
  • no relationship with or dependence on Tailscale as a company (if you run your own cmd/derper DERP server, at least)

What does “Tailscale” even mean?

When you watch people describe Tailscale to each other online, you see very different interpretations of what “Tailscale” means to them.

One group of people, often seen saying things like “I’ll just run WireGuard myself,” focuses on the WireGuard part and doesn't consider (or care about) parts like NAT traversal, DERP fallbacks, centrally managed firewall (ACL) rules, SSO login, tagging, MDM policies, audit logging, etc. Maybe they only want or need the WireGuard part on a public IP. That’s fine.

Another group of people talks more about the company, corporate structure, long-term viability, founders, funding stage, pricing, certifications, reliability, responsible handling of security disclosures, etc.

Another group of people talk about whether Tailscale is open source or not. As a reminder: our core is open source (with a real OSI-approved license!), our DERP server is open source, and our clients are open source on platforms that are themselves open source: Linux and Android. Our server-side control plane is not. A lot of people in this audience appreciate that Headscale (which we love and partially fund development of) exists, either to use today, or use in the future, as a fallback plan.

All of those interpretations are fine. Whether you’re using our official GUI client wrappers around our official control plane, with a corporate SSO identity provider, or you’re at the other extreme, using only tsnet on Linux nodes against your self-hosted Headscale server, there are many ways to wire up and use Tailscale and its many pieces:

  • Its WireGuard + NAT traversal + DERP fallback data plane
  • Its control plane
  • Its company (paying us to run and support things for you)
  • Its open source code

tailcat gives you another way to use a subset of Tailscale.

How it works

Let’s say you want to run a tailcat server. Here’s what it does:

  • generates a keypair (either ephemeral or named & reused)
  • picks a DERP server (either one you specify, or an auto-selected bandwidth-limited Tailscale-run one)
  • generates a tailcat address, which is a string of the form: tc + base64(CBOR( public key + DERP bootstrap info ))
  • you then share that address string with somebody out of band, either directly, or by putting it in a DNS TXT record, and sharing that DNS hostname out of band

The client side is about the same:

  • pick a key (ephemeral or locally named & reused)
  • connect to the rendezvous DERP server specified in the tailcat address
  • send a MEOW message to the server’s public key over DERP to add yourself to the netmap

At that point, if the server is cool with that client’s public key (it can be optionally locked down), then it replies with a happy MEOW reply.

The client then proceeds to make a TCP connection to the other side using an embedded userspace TCP stack atop WireGuard. There are actual IP addresses on the wire (IPv6 ones derived from your public key), but they’re never visible to users. Your operating system is never involved at the TCP layer and never sees the synthetic tailcat IPs. All your operating system does is send the DERP TCP messages and/or NAT-punched UDP WireGuard messages.

Two terminal windows. On top, Brad's sandbox runs a tailcat listener, piping the output to a tar command to extract any incoming content. The output shows a tailcat listener responding with a tailcat address and bootstrapped from a New York City relay server, and the directory llms and the files CODEX.md and CLAUDE.md being unrolled. The terminal at the bottom shows Kabir's macbook compressing the local llms directory with the tar command and sending the resulting content over a tailcat pipe using Brad's tailcat address.

Because it goes over Tailscale’s magicsock data plane, NAT traversal automatically kicks in and tries to get a direct connection, so data transfer (WireGuard UDP packets) ends up going directly between the client and server, without a DERP relay involved. But if both sides are behind a hard NAT without any port mapping services available, the data packets are relayed over DERP as a fallback. If you use Tailscale-hosted DERP servers, those are rate-limited (bandwidth costs us money). But if you run your own DERP server, you can control any rate limiting.

In the default mode where you don’t specify a port number on the tailcat server, the default is to just pipe the received data to the server’s stdout, like netcat. But it can also run in a client mode, where it runs a SOCKS server on an ephemeral local port and then runs a provided child process (e.g. curl or whatever) with an environment variable set to use said SOCKS server, letting tailcat-oblivious programs use tailcat transparently. (tailcat is currently always userspace-only, never reconfiguring your system’s networking stack … no TUN devices, no routing table changes, etc.)

Why?

I wrote tailcat in September 2023 on a long ten-hour flight while catching up on bad movies. At the time, tailcat was mostly a fun novelty. I presented it internally, and I’d use it occasionally myself, but I mostly forgot about it. But then a number of customers approached us with use cases where it was a perfect fit, so we gave them copies of it, with arrangements where we’d host the DERP fallback relays for them in cases where tailcat’s use of Tailscale’s magicsock fails to get a direct connection.

Fast-forward to a few months ago, when all this AI agentic coding stuff was in full swing. It’s been really powerful to just give my sandboxed AI agents access to make their own also-untrusted nested VMs and give them tailcat. With access to exotic hardware in faraway places, I let the AI go wild wiring things up to each other and running experiments. Off the top of my head, I can recall:

  • giving an agent access to a fleet of every Raspberry Pi generation
  • giving an agent access to a sandboxed EC2 instance that had ambient access to control a nearby EC2 instance and kexec reboot it repeatedly, while porting Tailscale to run in EC2’s UEFI environment, including porting the Amazon Nitro ENA network driver to pure Go (under Tamago)
  • giving an agent access to a Windows host to repeatedly create and destroy Hyper-V VMs to debug and fix a stack corruption bug in the Go runtime and standard library

In most of these cases, I probably technically could’ve just used Tailscale proper, but it would’ve been more tedious to the point that I probably wouldn’t have even done it, and would’ve just set up a few port forwards instead, or opened up some ports on a firewall somewhere. I find that tailcat is often the perfect tool when I already have two shells open on two machines in two very different worlds and I just want to connect the two together, for a quick file copy, or port forward, or letting one SSH to the other. Especially when one side is untrusted or ephemeral or I’m afraid to touch its system configuration.

When we launched Taildrop in 2021, one of the first requests was for netcat-like sharing between nodes. tailcat now provides that, and more. We’d still like to do something tailcat-like in the main Tailscale client too, but we’ll have to figure out how that fits into the rest of the Tailscale product.

Another reason to open source tailcat is that it’s kinda obvious and inevitable. We’d selfishly rather people be using, improving, and filing bugs against our data plane, which then makes the rest of the Tailscale product better.

I would be remiss if I didn’t mention that you should contact us if you have fun use cases where tailcat might help you, and where we can help you integrate tailcat or run a global fleet of DERP relays for you. (e.g. IoT, P2P games, distributed GPUs, etc.)

The DERP server fleet we’re running for tailcat is throttled and only available in a handful of regions around the world. The idea is that, most of the time, our magicsock NAT traversal will do its thing and DERP isn’t relevant, with tailcat getting a direct UDP WireGuard connection between the two peers. But in cases where that fails, we’d be happy to exchange money for goods and services.

Or, hey, run your own DERP fleet or single server. It’s open source too.

Enjoy!

We look forward to seeing what you build and how you use this. Give tailcat a spin here.

Read the whole story
emrox
47 minutes ago
reply
Hamburg, Germany
Share this story
Delete

How To make your own kick drums in Diva

1 Comment

With so many kick drum samples available, it’s easy to overlook the benefits of programming your own. It only takes seconds.

Kick drums, eh? You can’t live with ‘em, but you can’t live without programming ‘em. Except, of course, you can – there are bloody millions of kick samples to choose from! So why bother programming your own? Three reasons, really.

  • 1. It’s a great way to really tailor your kick to your track.
  • 2. It helps your productions stand out.
  • 3. It’s good for the soul to go beyond presets and make your own sounds.
  • And… er…. 4. It’s too easy not to give it a go.

STEP 1

First thing’s first: the meaty bit of pretty much every electronic kick you’ve ever used is based on applying a pitch envelope to a simple oscillator like a triangle or sine wave. That’s how the 808 did it. That’s how the 909 did it. And that’s how we’ll do it. So start by loading Diva and selecting an INIT patch.

STEP 2

Now let’s configure Diva’s modules. Choose DUAL VCO (oscillators), HPF PRE (high pass filter), MULTIMODE (low pass), and Analogue (both envelopes). Then program a four-four kick pattern on F#1. And let’s use a short 1/16th length as that allows plenty of length control later.

STEP 3

DCO settings next. Start with Osc1 to triangle (the 909-style layer) and Osc2 to sine (808 vibes). Then set Tune MOD mode to BOTH, to make sure the pitch envelope applies to both. And apply SYNC so both trigger together without intermittent phase cancellation between them.

STEP 4

Now let’s turn it into a kick drum. First set the Tune MOD Env to fully +. Envelope 2 is now controlling the oscillator pitch so start by setting Sustain and Release to 0. See how you can hear the pitch coming down quickly already? Now slowly pull the Decay down to 32… and there’s our kick drum!

STEP 5

Let’s look at the different ways of tailoring our kick next, starting with the amp envelope. First bring Sustain down to zero and then try raising Release from 20 to 50. Release is the key length control for our kick. But, as you can hear, it’s also central to the tonality of the kick, ranging from tight 909-style to tonal hardcore techno.

STEP 6

The filter section is the key to adding some of that distinctive 909 kick click we all know and love. Set the lowpass Env2 amount to fully + and then start lowering the cutoff down to around 34. Now we’ve got a click. We can also try flicking the Mix between Osc1 and Osc2 to hear the difference. Osc1 is that tight, clicky 909, Osc2 is the more tonal, saturated-sounding 808 style.

Filtered

Filtered Osc1

Filtered Osc2

STEP 7

Finally, try tweaking the Fine Tune to adjust the tuning of the kick. And you can also experiment with different MIDI trigger note values and lengths, but that will only really make a lot of difference on kicks with longer release times for more tonality. This can be fun for edits, as you can hear below.

Fine-tune up

Fine-tune down

Pitch edit 1

Pitch edit 2

BONUS TIP 1

You can use these kicks as a powerful sub bassline tool by layering them with another kick sample… and then raising the amplitude envelope a tiny bit. That way you have the huge bassline power of a long kick but without overloading the transient section or taking away from your chosen kick sample. But there’s a snag. Have a listen…

BONUS TIP 2

 As you can hear, the sound of each synth kick varies a little from the previous because their long decay tails are causing interactions with the following ones. To avoid this, render out your Diva kick and simply loop the audio over the ¼ bar section you like the sound of. Listen to how much more effective that is now…

BONUS TIP 3

As we just saw, analogue synth-style kicks like this do have a tendency to have minor little variations (more or less click or slight timing / phase variations. This is the nature of analogue emulation, and can sound great in organic electronic music, but for tight, club bangers it’s often worth sampling out a single kick you’re happy with and using that for every beat instead.

So there it is - a fully customisable kick with a blend of classic 808 and 909 vibes. We’ve made it in a bog-standard subtractive synth configuration in Diva, to show how easy it is, but imagine how much more detailed, individual control and processing you can get over the two oscillators with a modular or semi-modular option like Zebra 3! And don’t forget, these are all dry and unprocessed. Be sure to fire up your compressor and EQ to sharpen them up in the mix.

Find out more about Diva on the u-he website, including the free trial.

[social-links heading="Follow Attack Magazine" facebook="https://www.facebook.com/attackmag" twitter="https://twitter.com/attackmag1" instagram="https://www.instagram.com/attackmag/" youtube="https://www.youtube.com/user/attackmag" soundcloud="https://soundcloud.com/attackmag" tiktok="https://www.tiktok.com/@attackmagazine"] [product-collection]

Read the whole story
emrox
7 days ago
reply
For the time when I actually find time to enjoy making music again
Hamburg, Germany
Share this story
Delete

Everything I own, owned

2 Shares

Over the past couple weeks I’ve been doing agent-driven reverse engineering of peripherals that happen to be within arm’s reach. From those devices, I’ve come away with a full plaintext command shell inside my microphone, a webcam whose activity LED I can switch off while it records, and a key light that hands out memory writes to anyone on the WiFi. Peripherals have proven to be an ideal target for agentic RE - they’re tiny computers attached to my computer, with a data connection to the host and usually a firmware update mechanism, so an agent has something to iterate against. The net outcome is better control and understanding of my machine.

My process was pretty much the same for each of these devices: grab a copy of the device’s firmware and associated update tool from the manufacturer, throw it into my reverse engineering environment, tell Claude Opus 5 what my goals are, and let it churn. Depending on the device, the goals were somewhat different, but they usually looked something like:

In this directory is the firmware and update utility for ___. The device is also attached to this computer, and you may interact with it in non-mutating ways. Exhaustively document and cross-validate the entire firmware, including the following goals:

* reverse engineer the firmware update format and update protocol
* implement our own update utility
* determine the security properties of the update protocol, including checksums, signature validation, secure boot
* use static and dynamic analysis to determine all protocol surfaces and completely enumerate functionality
* find any hidden or debug functionality in the product and how to access it

Depending on the results, there were different directions of follow-up, but you should get the general idea. Let’s run through the list - each device links to a GitHub repo full of generated-slop docs and scripts, most of which have been validated live against real hardware. I’ve also included the effort each device took, pulled out of the Claude Code session transcripts. “Churn” is the time Claude was actually working, with the long idle gaps removed. “Prompts from me” is every message I typed, including the one-word ones telling it to keep going. All five devices together came out to about 13 hours of churn and 98 prompts, spread across two weeks of evenings.

Everything I own

GitHub repo - 3.7 hours of Claude churn, 33 prompts from me

Insta360 Link webcam, its green activity LED lit

I use an Insta360 Link webcam, which is a nice gimbaled pan-tilt-zoom camera that does face tracking for automatically framing the shot. I wanted to know if it was possible to subvert the activity LED, like in the classic iSeeYou exploit.

Interestingly, it was immediately obvious that this camera has a lot going on inside it. It turns out that it runs a whole RTOS (ThreadX) sourced from the upstream SoC vendor, Ambarella. The RTOS hosts several small vision models that provide things like the aforementioned face tracking, as well as gesture detection for controlling settings. Pretty amazing complexity inside a tiny webcam, but it also means there’s some exciting attack surface here.

Over the USB Video Class interface, there’s an XU (Extension Unit) command that kicks the device into “mass storage” mode. This then lets us transfer a staged firmware update to the device’s internal FAT filesystem, which the device then applies to itself on reboot. This route does require user intervention to reboot with a replug, but there’s actually another command channel that exposes arbitrary read/write of files and a reboot command over the USB vendor class. With this, we can fully flash the device without any user interaction. Once the firmware is in the right place, there’s effectively no anti-tamper, just an appended MD5 hash to ensure integrity.

The indicator LED turns out to have a well-structured set of “patterns” in the firmware that dictate color, blink pattern, etc. that are indexed into for various device states. I had Claude write a tool to patch out the table entry for camera activity, fix up the integrity hash, and flash it to the camera. A quick test showed that the green LED that normally illuminates while recording no longer turned on. Horrifying! On this device, the gimbal itself also deflects down when not recording, so it’s not completely stealth, but it still doesn’t feel great.

The LED behavior before and after patching.

ASUS ROG Swift PG42UQ monitor

GitHub repo - 1.2 hours of Claude churn, 13 prompts from me

ASUS ROG Swift PG42UQ monitor

My ASUS ROG Swift PG42UQ monitor was actually where I started, because I got annoyed at the pop-up overlay that comes up every once in a while that tells me to run “pixel cleaning”. I have never intentionally run pixel cleaning on this monitor and I never will, I don’t care, and I would like for that overlay to go away forever. Maybe there’s a debug menu or something that can turn it off, or worst case we patch a branch in the firmware?

Claude found that the firmware has effectively no protection whatsoever - there’s a two-slot A/B scheme and a simple checksum, but ultimately we can write whatever we want to the thing. Firmware updates run over an I2C bus bridged over USB.

The pixel cleaning warning turns out to have no native way to disable it, and it’ll always show up after 8 hours of runtime. Oh well. Claude did find the appropriate area to patch to kill the functionality though. I haven’t actually been brave enough to write a modified firmware to the thing yet - it’s a pretty expensive monitor - but I’ll get there at some point.

Another neat thing was exploring the DDC/CI interface. This is the control channel available over the display cable itself, allowing the host to change inputs and other settings. I believe ASUS offers this through their Windows utility, DisplayWidget, but that does little for me on Linux. So, now I have a shell script that can flip through some of the DDC/CI features like the hardware crosshair or zoom overlays, FPS counter, and countdown timer. I might set up some of these on hotkeys in the future for easy access.

Shure MV7 microphone

GitHub repo - 4.2 hours of Claude churn, 32 prompts from me

Shure MV7 microphone

At this point, there’s less actual incentive to keep popping these devices and more just morbid curiosity. My microphone, the Shure MV7, connects over USB and obviously has some amount of smarts to it, with on-device digital volume controls and such.

The firmware for this one turned out to be hidden inside the Windows software, MOTIV Mix, so Claude installed that in Wine, found the update server, and pulled it down. I wasn’t on the latest, so there was actually a reasonable incentive here to get this working just to update my microphone from Linux. The firmware turned out to contain both DSP and MCU firmware, and was honestly pretty boring as you might expect. Again, no real security on the firmware flash itself.

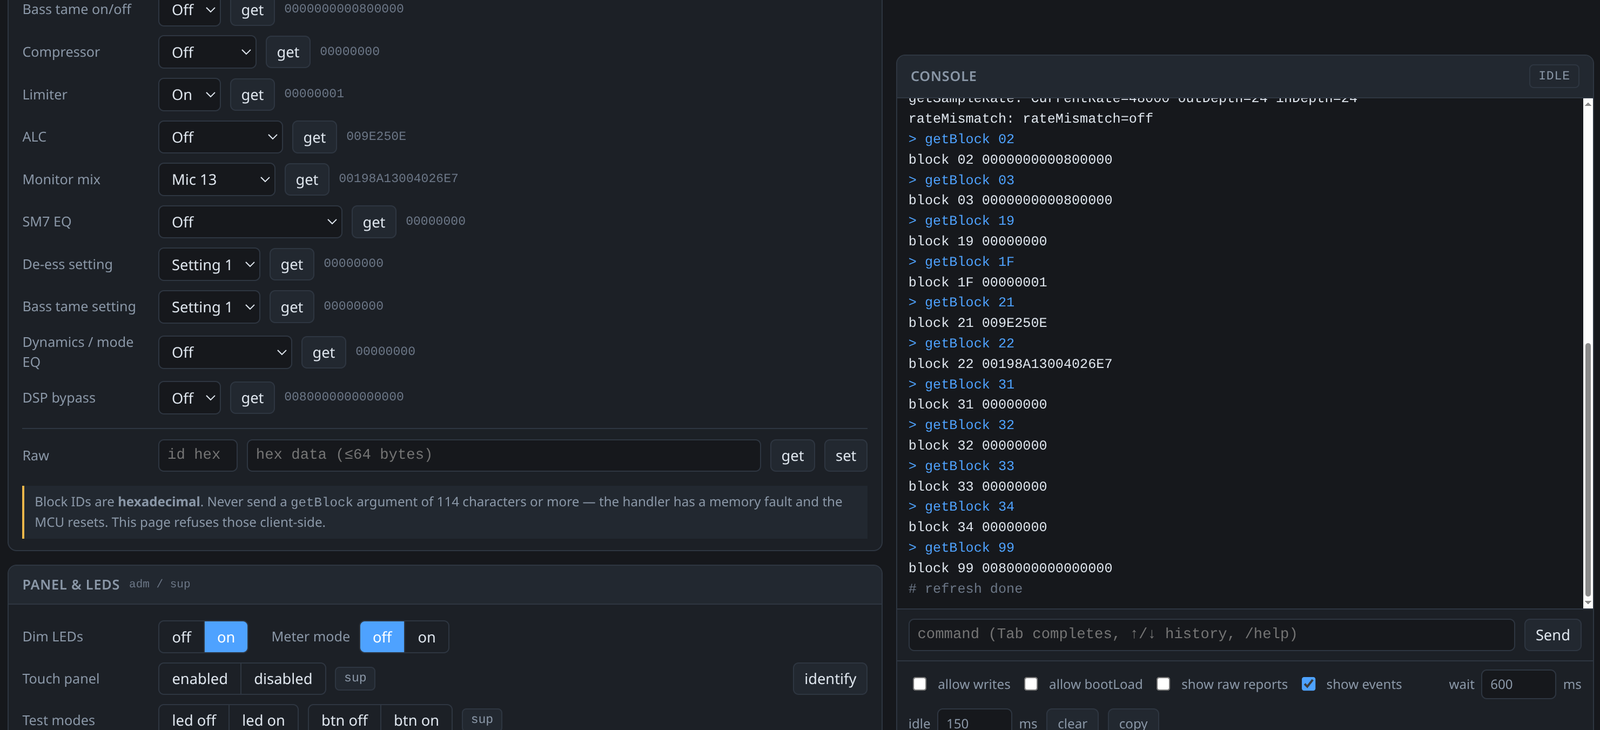
However, the update protocol revealed that the entire thing actually runs over a USB HID vendor class protocol that implements a full plaintext command shell, with 48 different commands. Since it’s HID, we can actually hit this over WebHID from a webpage in Chrome, so I had Claude build a web interface for using the shell. There’s all sorts of interesting settings in here including a dozen DSP knobs, arbitrary memory read/write, LED control, and a 4-tier user privilege system whose entire authentication is a string comparison against the name of the tier you asked for. su sup just works, and the top tier can disable the touch panel so you can’t mute at the device, and drive the mute LED independently of whether the microphone is actually muted. It’s the webcam LED trick again, on a microphone. Obviously, be aware that you could probably break your device if you use that UI and do something stupid with it.

WebHID interface for the MV7’s command shell, showing DSP settings and a console The WebHID shell interface. The DSP knobs on the left are the device’s own settings; the console on the right is the plaintext command shell talking over HID.

GitHub repo - 1.5 hours of Claude churn, 10 prompts from me

Elgato Cam Link 4K video capture dongle

The Elgato Cam Link 4K is just an HDMI video capture device, and honestly was just more of the same. The interesting thing for this one was that I let it go fully unattended - I literally kicked off the process before going to sleep and woke up to a teardown and functioning firmware updater. The firmware contains an MCU image and an FPGA bitstream for the actual HDMI handling, so you could potentially do something fun with the FPGA if you went deep enough into the reverse engineering there. There’s no protection on the firmware update path.

I was able to pull out all the EDID information used for negotiating video parameters, so we know exactly what resolutions, refresh rates, color spaces, and chroma subsampling options are offered to devices.

The vendor HID protocol does include tunneled access to the internal I2C bus, which is kinda neat as you can poke the internal HDMI receiver registers.

Elgato Key Light Mini

GitHub repo - 2.4 hours of Claude churn, 10 prompts from me

Elgato Key Light Mini

Finally, I poked at something that wasn’t connected over USB but WiFi instead, the Elgato Key Light Mini. This one turned out to be way more interesting than I expected: it’s the only one with meaningful firmware integrity protection. Elgato signs the firmware updates with Ed25519 over a SHA-512 hash of the firmware payload, and rejects firmware that doesn’t validate. This makes sense to do, as the device basically connects to a WiFi network and then provides unauthenticated access to anyone on the same network, so the threat model is inherently different.

Unfortunately, while that’s an improvement over all of the other devices we’ve looked at, it protects the firmware at exactly one point in time: when an update is happening. It’s not a boot time check enforced by the bootloader or any other kind of secure boot scheme, and the updater happens to be running while everything else in the device is still operating, meaning there’s huge attack surface to try to disable that signature validation. I asked Claude to look for an exploit that might enable this, and it found a doozy: an HTTP POST request that drops a payload straight into the internal UART, which includes a memory poke command. This means that a single HTTP POST of ATSE=0200ED94,0E001009 turns the signature check into a no-op, and we can freely update to a firmware image without a legitimate signature. I successfully tested this with a simple patch that changed the name of the device, so uh, yeah, don’t put these on an untrusted network.

…, owned

I have a lot of feelings about this whole thing. As I wrote back in March, this is incredible for interoperability and fixing things that don’t work how we want them to. Hardware is almost universally “open” for tinkering at this point with just a couple hours of mostly hands-off machine-driven labor each, and I look forward to a near future where I can add features to my webcam firmware as easily as I can to software that runs on my Linux machine itself.

On the other hand, as a security professional, this scares me for several reasons. I would work from the operating assumption that any device attached to a computer could have had a malicious firmware implant performed, where previously that required significant per-model investment and was stereotyped as a “state actor” kind of activity. Operating systems aren’t really equipped to work with the user to ensure that a microphone stays a microphone, and doesn’t spontaneously turn into a keyboard that hits Win+R and drops a payload to steal all your data when the room is quiet enough that it can assume you aren’t watching. And the existence of WebUSB, WebHID, and WebBluetooth mean that for some devices, depending on the specifics of which classes are used, a moment of user indiscretion in accepting a permissions prompt could permanently backdoor one of their attached devices.

Network-connected devices seem near universally fucked at this point? There are a few others I’ve poked at that I haven’t documented here, but I’ve gotten a root shell on a commercial Dell display, and RCE on an Eaton UPS. Obviously it was never best practice to let untrusted clients touch these things, but the speed and scale at which this can be executed makes the risk so much higher now.

Finally, I can’t help but think about what an AI-equipped automatically-reverse-engineering worm could do today. It’s only a tiny leap to imagine that someone could make a self-replicating piece of malware that probes its environment, relaying reconnaissance back to a smart command-and-control that actively works to push itself into accessories and IoT devices and industrial equipment found adjacent to an infected target. Two things have kept this from happening: every device model needs its own reverse engineering, and validating any of it needs the hardware in hand. The first is the labor I just handed to an agent. The second is free to malware already sitting on an infected host. Honestly, I wouldn’t be surprised if this already exists, and I think the next few years are going to be extremely interesting. 🫠

Read the whole story
emrox
8 days ago
reply
Hamburg, Germany
Share this story
Delete

How we migrated lovable.dev away from Next.js and turned it into another Lovable app

1 Share

lovable.dev is a pretty busy website: we have 42M+ monthly unique visitors. It's also pretty complex: close to 400 routes, 910K+ lines of non-generated code, supports over 150 agent tools, and even has a small IDE with syntax highlighting inside. It's now hosted on Lovable, the same way as any other Lovable app.

Why we did it

Before we migrated, lovable.dev was a Next.js app hosted on Vercel. (We originally hosted it elsewhere, but started to hit issues as we scaled, like build compatibility between local & prod or poor loading times in certain geographies.) Vercel performed admirably, and our issues went away as soon as we moved to it. That said, we decided to migrate our hosting to Lovable for several reasons.

The main reason to use our own product is dogfooding. We want to feel our users' pain and we want to have the shortest possible feedback loop to keep making our product better for users.

We also want to push the frontier of single-app scaling. We were already good at hosting tens of millions of apps, where the median app is small and low-traffic. Supporting tens of millions of visitors for a single app is a different problem with its own unique challenges. Every improvement we make for ourselves automatically benefits every builder who runs their app on Lovable.

And finally, we wanted to pass any internal knowledge on making the best web apps back to our builder agent—and make every user see the benefits for their apps. With a unified tech stack it's easier than ever.

Background on how we host apps

Today Lovable builds and hosts primarily TanStack Start apps. The framework fits our needs for isomorphic execution, simplicity of deployment and type safety particularly well; see our post “Building apps using TanStack Start” for more background on reasoning and how we use the framework. Each published Lovable app is built as its own worker for Cloudflare's workerd runtime. Then a single entry worker serves every app by loading the code, creating a worker dynamically and dispatching a request to it.

Every dynamic worker lives in its own V8 isolate sandbox. An isolate is a private V8 heap that lives inside a controlling process—a cheaper alternative to using a separate process. Think containers vs. virtual machines. Isolate instantiation cost is proportional to the worker bundle size and could be 4ms at the cheap end up to 1s for a huge bundle. Isolates are cached and reused, so that loading and instantiation overhead is amortized across many requests. This is the part that makes running millions of apps economical. Isolates are typically evicted on an LRU basis or when they get over the memory limit. Eviction is not always graceful—we'll get to that later.

We migrated lovable.dev to TanStack Start to serve it the same way—now it's just one of the possible destinations among 60M+ of our users' apps. There are fewer than 200 lines of code unique to the lovable.dev serving path (mainly handling a different release metadata format and a different observability setup).
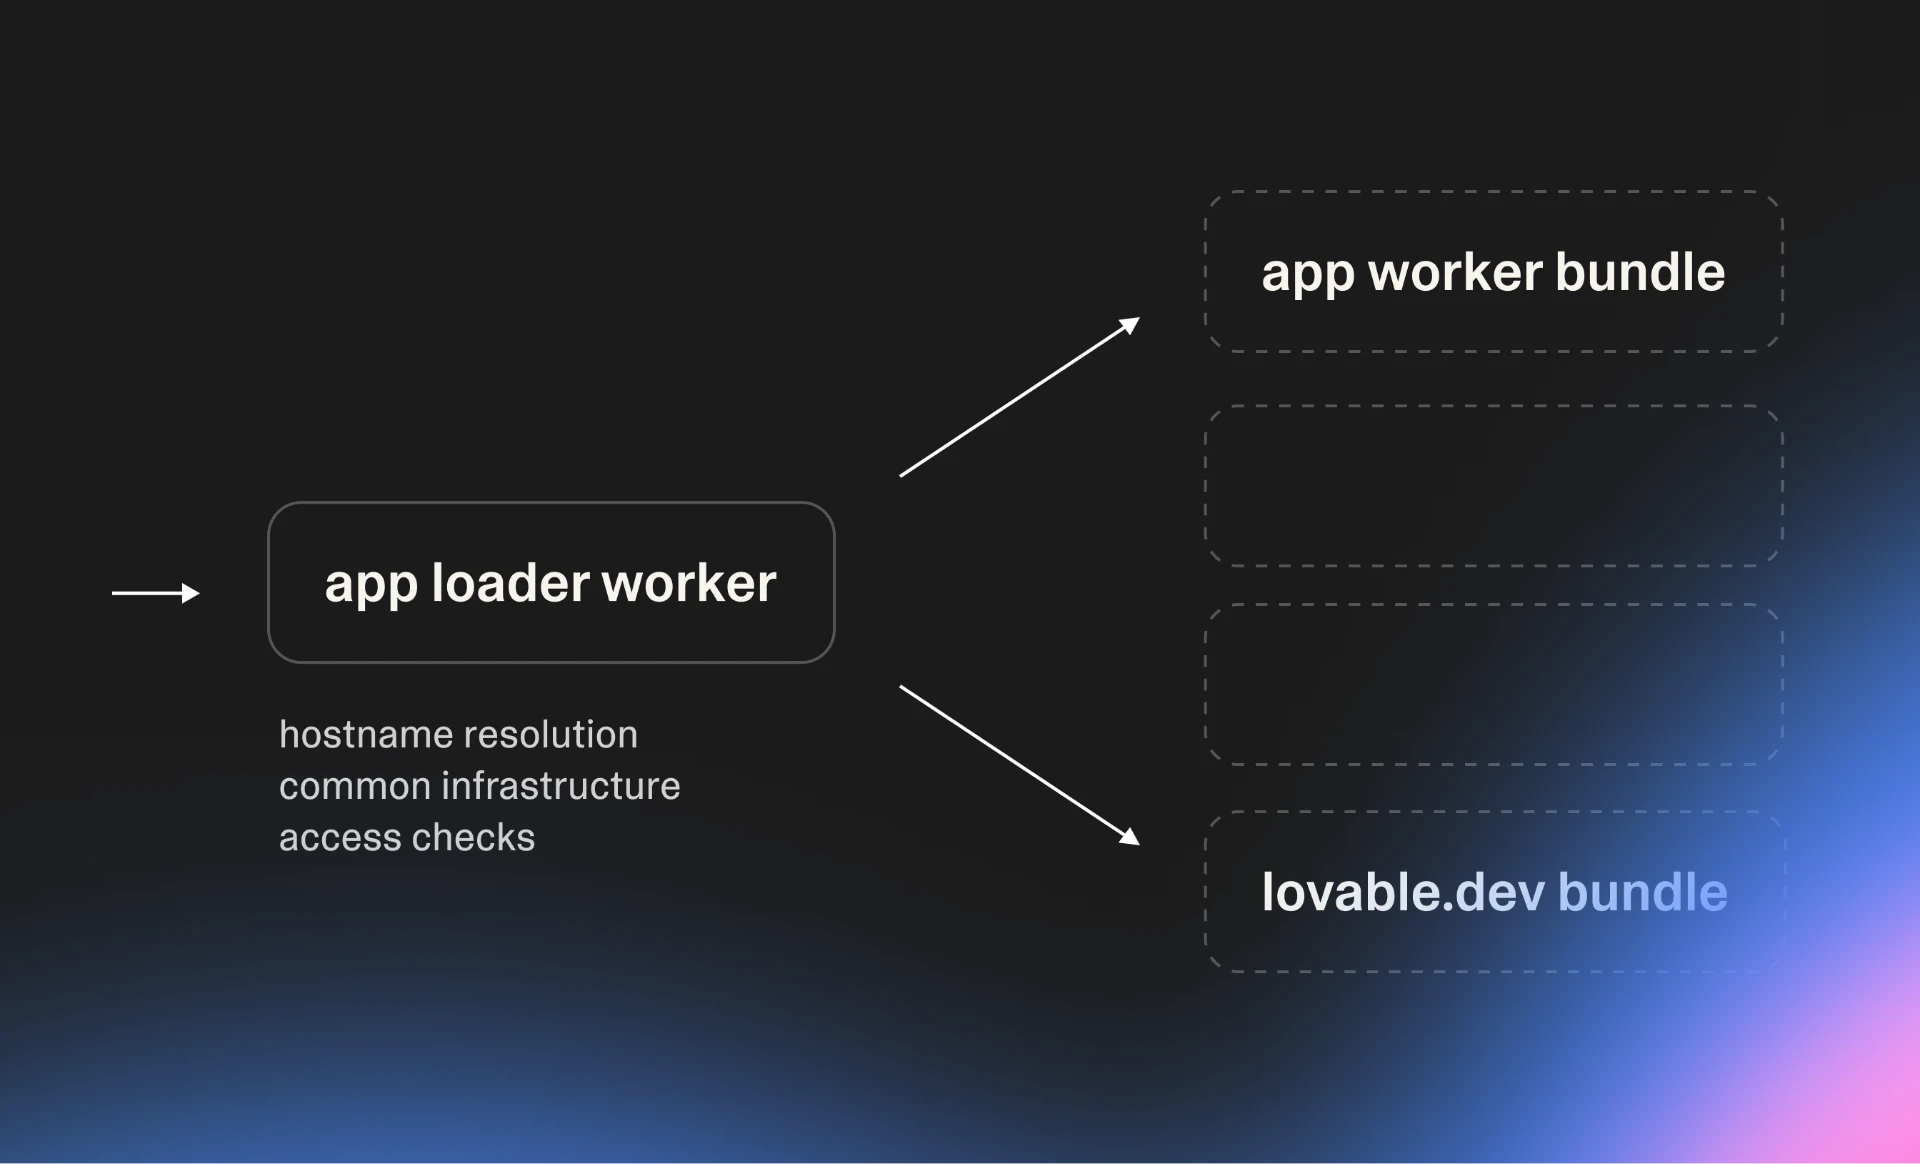
A single app loader worker handling hostname resolution, common infrastructure and access checks, dispatching to one of many app worker bundles—one of which is the lovable.dev bundle.

lovable.dev is served by the same app loader worker as every other Lovable app—it is just one more bundle among 60M+.

Migration strategy

Migrating a rapidly-developed app is a kind of race where the finish line is running away from you. I started it as a lone developer looking at 350K lines of code. By the time the migration was complete, six months later, the app had grown to over 850K lines (and we've already added 60K on top since then). People here just never stop shipping new things.
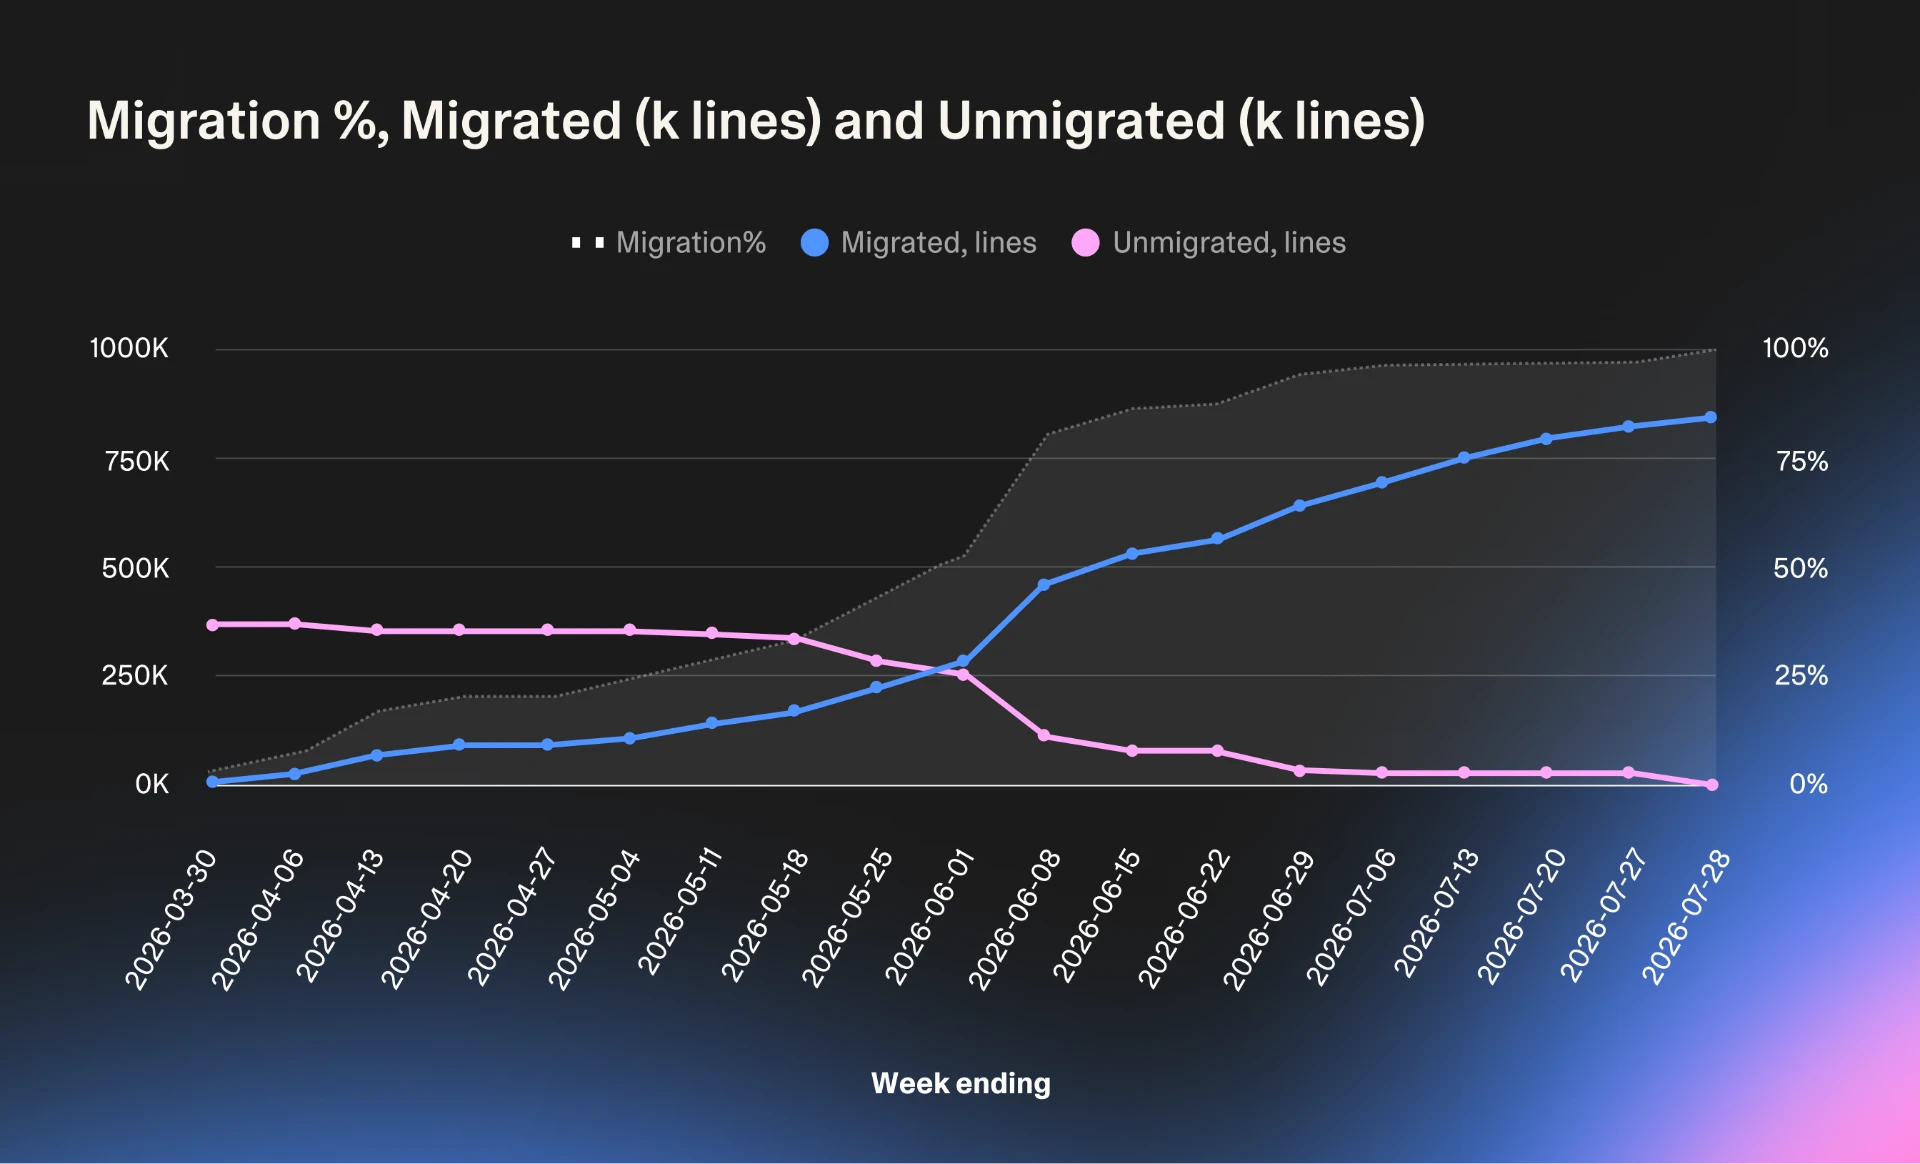
Chart of weekly migration progress from March to July 2026: migrated lines climbing from near zero to 850K while unmigrated lines fall from 375K to zero, with migration percentage reaching 100%.

Migration progress, week by week. The total kept growing under us the entire time.

The overall plan was shaped by one of my big professional regrets from before Lovable: working on a big-bang migration in parallel with the old system that was still running and switching after achieving feature parity. This time I chose a different approach: we'd rewrite it gradually while keeping everything working on both frameworks. In retrospect this proved to be the most important single choice made in the migration.

Running two frameworks in parallel

We needed to run both frameworks in parallel and dispatch requests to the right one. This way the migration would happen route by route rather than all at once.
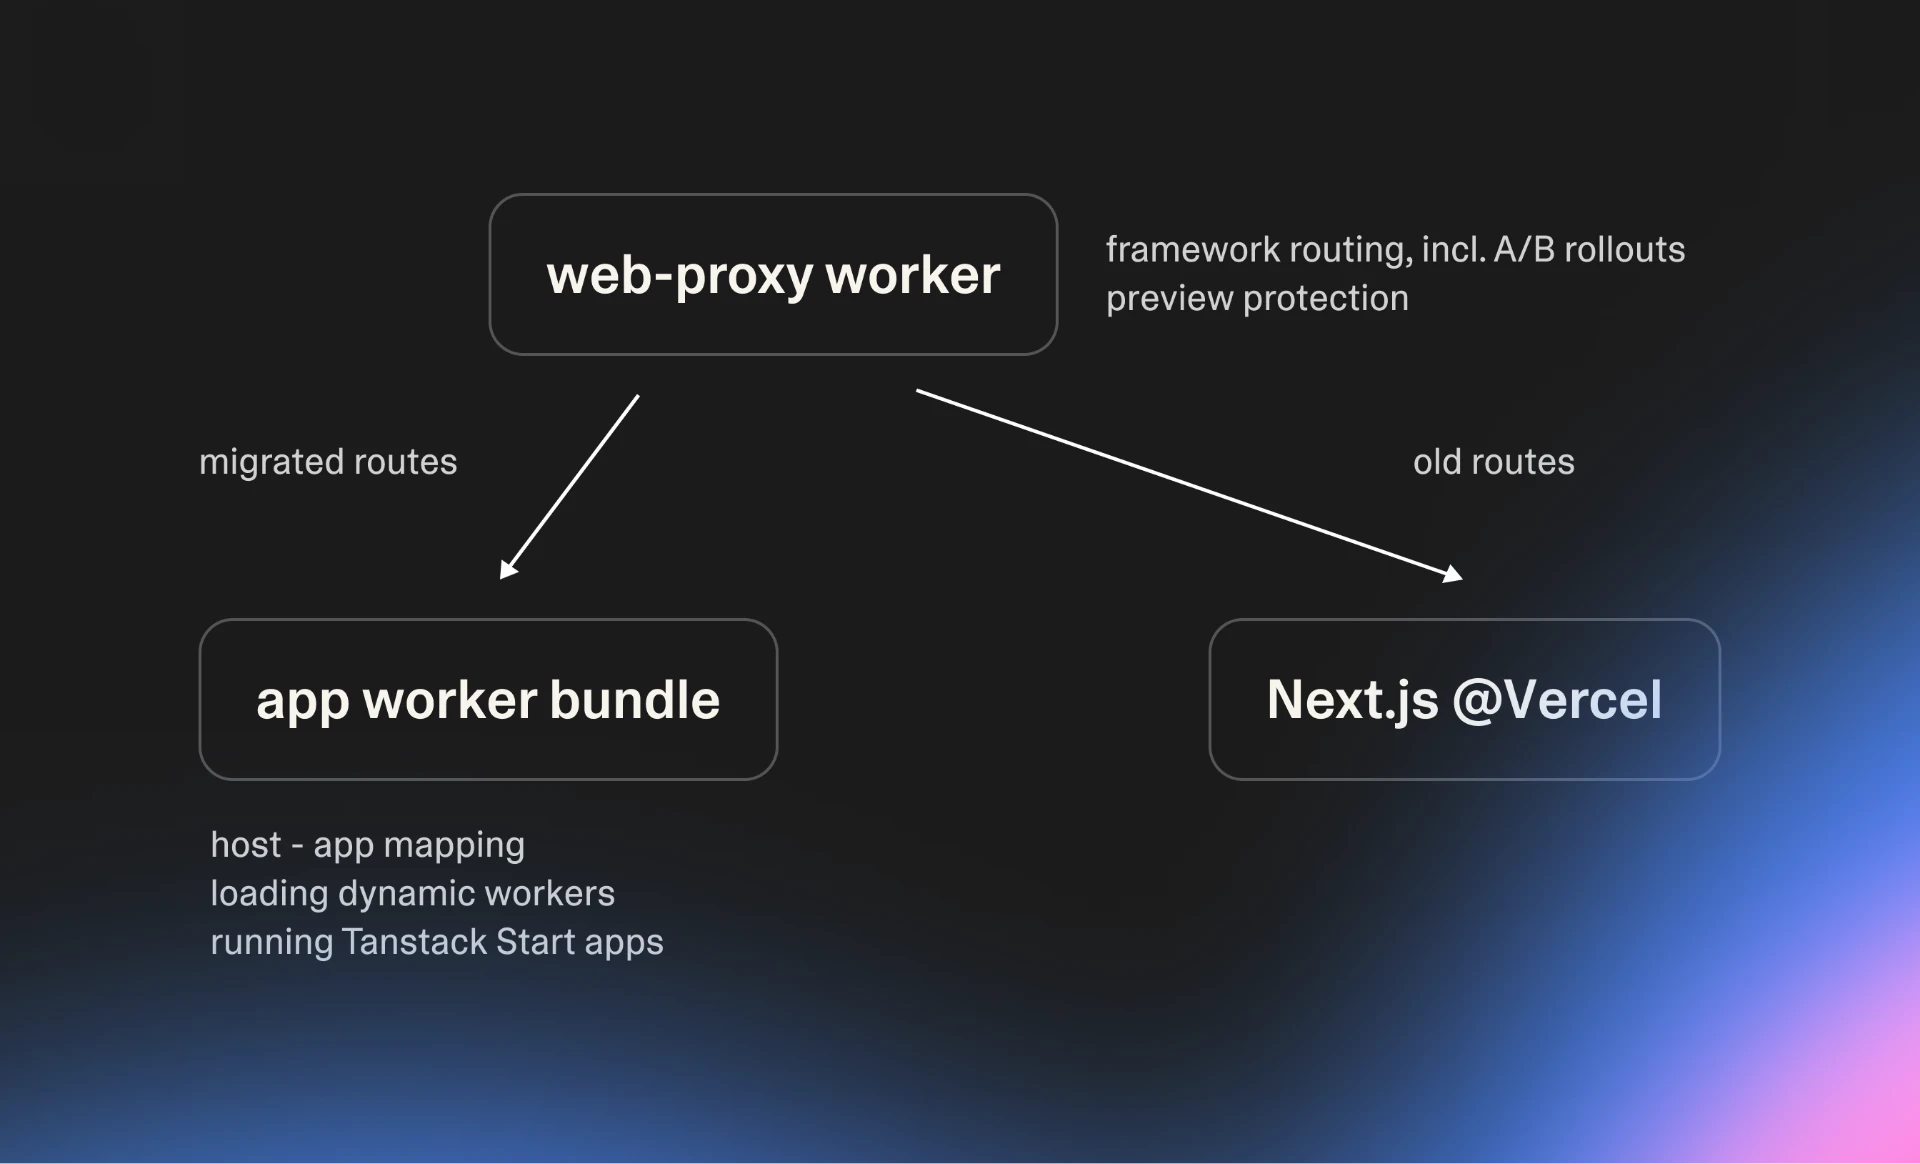
A web-proxy worker handling framework routing including A/B rollouts and preview protection, sending migrated routes to the app worker bundle and old routes to Next.js on Vercel.

A proxy worker in front of both frameworks decides, per route and per user, which one serves the request.

One important aspect of this setup is user experience. Crossing the line between frameworks means hard navigation—the user's browser needs to load a new document and a new set of resources. Compared to that, internal (soft) navigation only loads some scripts and the data for the new route, reusing everything else. In practice hard navigation is much slower (~5s vs. ~1.5s median for live users before the migration), so we needed to keep it as infrequent as possible.
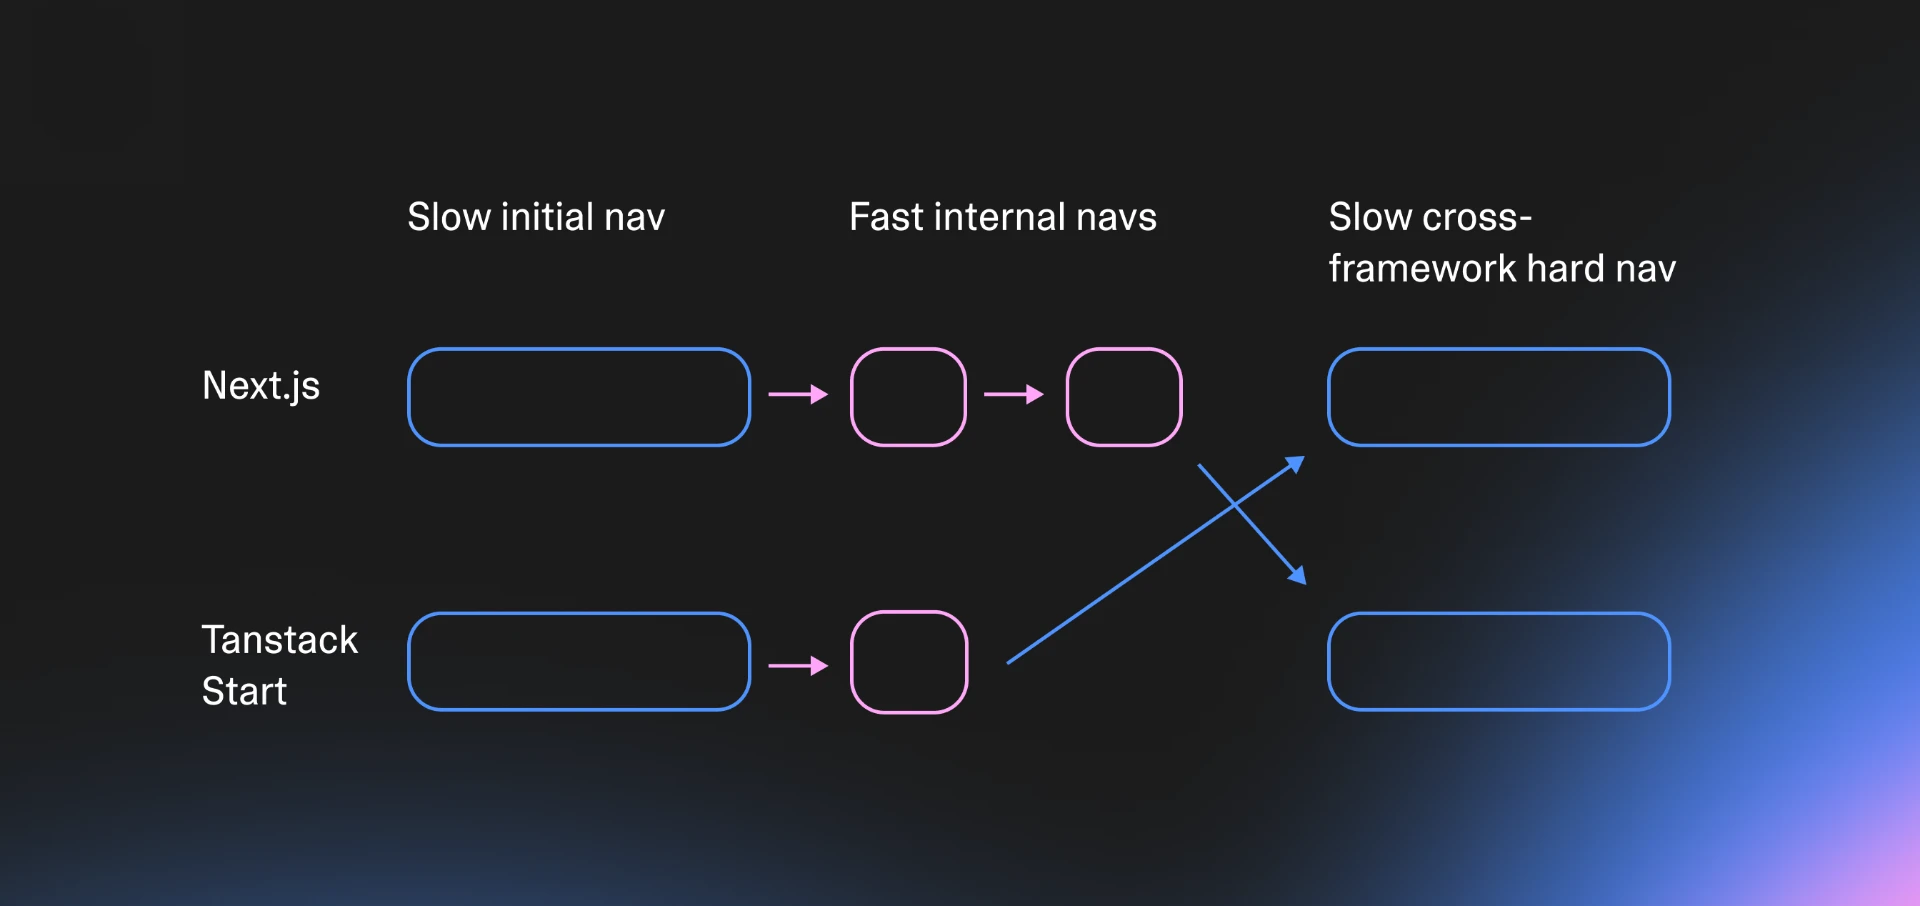
Diagram contrasting a slow initial navigation and fast internal navigations within each framework against the slow cross-framework hard navigation between Next.js and TanStack Start.

Navigations within a framework are cheap. Crossing between frameworks costs a full document load.

To achieve this I mapped all our routes onto typical user journeys and created migration groups: routes users moved between frequently were migrated together. I ended up with five major groups and a few minor ones. Each group's rollout was controlled by a feature flag to make the switch within a group gradual—during rollout a certain configurable % of visitors would be randomly assigned one framework or another.

Smoothing hard navigations

One neat trick for making the visual experience of hard navigations better is the browser's cross-document View Transitions API: a single CSS at-rule that applies a smooth cross-fade transition, replacing the default white flash.

@view-transition { navigation: auto; }

The transition only fires when both the outgoing and incoming page carry the rule. After we added it, my colleagues stopped noticing hard navigations other than by their longer duration.

Framework stickiness

One interesting problem we solved along the way was keeping each user on whichever app they first landed on. If user A gets the Next.js version of the project settings they should stay on Next.js for all routes in the settings group. Same for user B who landed on the TanStack Start version—they should stay on their framework within a group. To solve this we extracted the route registry along with feature flag metadata and used it as a single source of truth for our proxy and both frameworks. Every framework understood, through wrapped router components, which routes should use soft vs. hard navigation.

Deterministic feature flags

How do you test end-to-end when you have randomized feature flags? I built a way to override framework selection deterministically so that tests could cover both frameworks reliably and verify they both work as expected. The proxy server sees internal search parameters and assigns the feature flag(s) specified in them instead of a random value. This is a generally useful capability for any system with feature flags—you want your tests to be deterministic and not affected by the current randomized rollouts.

Sharing the code

The next goal was creating a way to share the code between Next.js and TanStack Start. The target state was 5–10% framework-specific code and 90–95% of code being framework-agnostic and shared between both. In the end we got there—right before its removal, Next.js specific code was 3% of our web codebase.
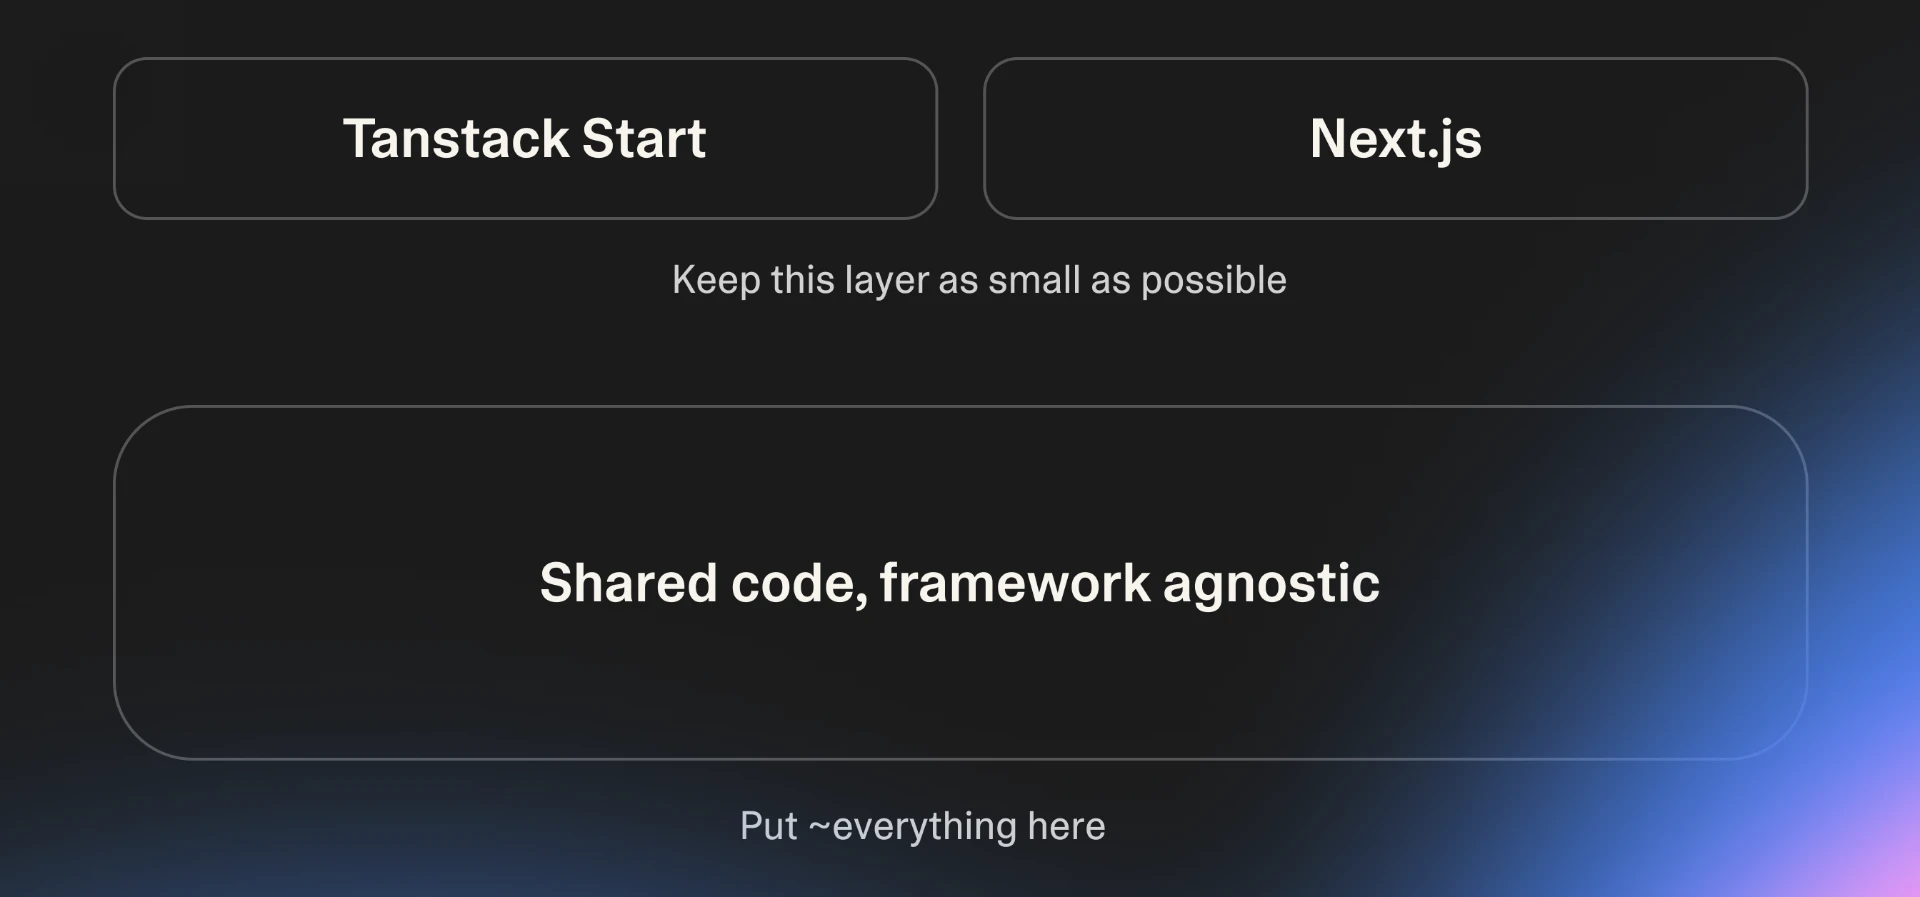
Two small boxes labelled TanStack Start and Next.js above the caption “keep this layer as small as possible”, sitting on top of one large box labelled “shared code, framework agnostic” with the caption “put ~everything here”.

The target shape: a thin framework layer over a large framework-agnostic core.

I selected a dedicated root folder for shared code and wired the #shared/ alias into both frameworks' module resolution (package.json imports, mirrored in tsconfig.json paths for the typechecker). I added lint rules to verify that shared code never imports either framework.

// web/package.json (TanStack Start)
"imports": { "#shared/*": "./shared/*" }

// app/package.json (Next.js)
"imports": { "#shared/*": "../web/shared/*" }
// works identically in either framework
import { buildUrlPath } from "#shared/lib/routes";
// oxlint.config.ts—shared code stays framework-agnostic, enforced
{
  files: ["web/shared/**/*.{ts,tsx}"],
  rules: {
    "no-restricted-imports": ["error", {
      paths: [
        { name: "next", message: "Shared code cannot depend on Next.js." },
        { name: "@tanstack/react-start", message: "Shared code cannot depend on TanStack Start." },
        { name: "@tanstack/react-router", message: "Shared code cannot depend on TanStack Router." },
      ],
      patterns: [
        { group: ["next/*"], message: "Shared code cannot depend on Next.js." },
        { group: ["node:*"], message: "Shared code cannot use Node.js APIs. Must be runtime-agnostic." },
      ],
    }],
  },
}

Describing this whole setup in AGENTS.md and iterating a few times got us to a state where any new feature was written in a portable way by default.

Preventing regressions

At some point in the middle of the migration I added another check: no new feature code outside of #shared. “Feature code” is a fuzzy concept, but using agentic automation instead of a deterministic check made it verifiable. This helped by both preventing new non-portable code from appearing and also by educating developers who were for any reason not aware of the ongoing migration. Here's an example of such a check finding that a PR is compliant:
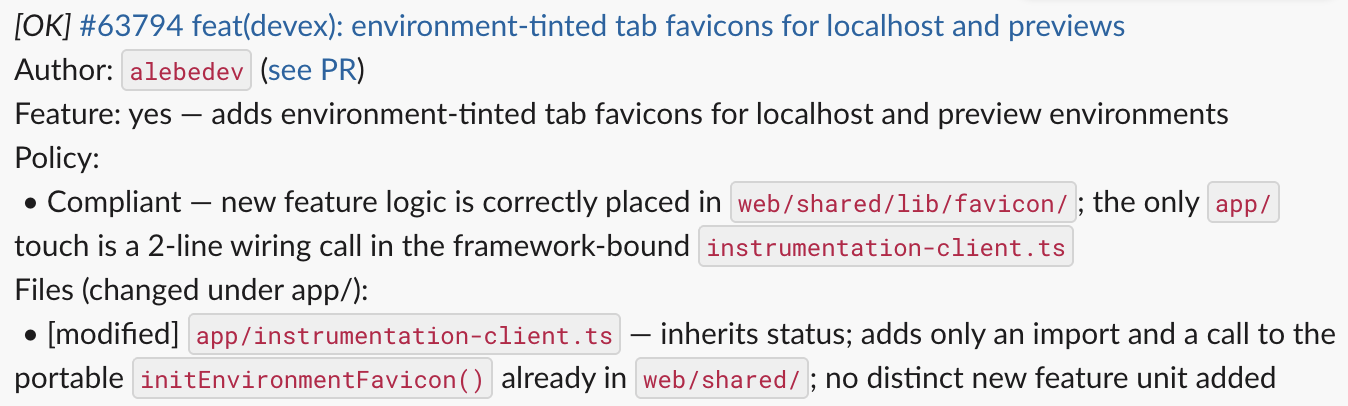
Automated check output on a PR: status OK, feature yes, policy compliant—new feature logic is correctly placed in web/shared/lib/favicon and the only app/ touch is a two-line wiring call in the framework-bound instrumentation client.

The portability check explains its verdict per file, so authors learn the rule at the moment it matters.

Adapters and compatibility layer

Once you have shared code, how do you handle the situation when some deeply nested component needs to import next/link to show a navigation button? I'd rather not keep each such component in the framework-specific part of the code. I briefly considered doing some dependency injection via a top-level Provider, but that meant replacing imports with reading from a context—a big change that can also have runtime overhead if you're not careful.

What I ended up implementing is a sort of interface-based dependency injection. Shared code declares a common denominator interface, and each framework implements it. Then, thanks to TypeScript import aliases, you just import the thing you need instead of interacting with the dependency injection mechanism explicitly.

// app/tsconfig.json:  "@platform/router": ["./lib/router/next-adapter.ts"]
// web/tsconfig.json:  "@platform/router": ["./lib/router/tanstack-adapter.ts"]

// next-adapter.ts
export { usePathname } from "next/navigation";

// tanstack-adapter.ts
export function usePathname(): string {
  return useLocation({ select: (loc) => loc.pathname });
}

// shared code, works under either framework
import { usePathname } from "@platform/router";

Platform adapters were the last missing piece to unlock moving 90+% of the code to the shared section.

Trimming to the core

One way to keep the framework-dependent part small is to use fewer framework APIs in the first place. They would need to be replaced with something else in the end anyway—so why not start early and swap some framework-specific APIs with something framework-independent? For us that was next/font and next/image, plus our authentication and i18n solutions, each of which was built on a third-party library that relied on Next.js.

Doing those early migrations while still running Next.js reduced overall risk and gave us some quick wins. For example, the new in-house auth library improved stability and brought a 10x+ reduction in the number of Firebase Auth calls. And a new i18n solution improved both runtime performance (~3x lower CPU cost of i18n initialization at page load) and compile-time safety (a misspelled translation key became a typecheck error).

Now that we depended on a smaller slice of the framework, the migration itself could start.
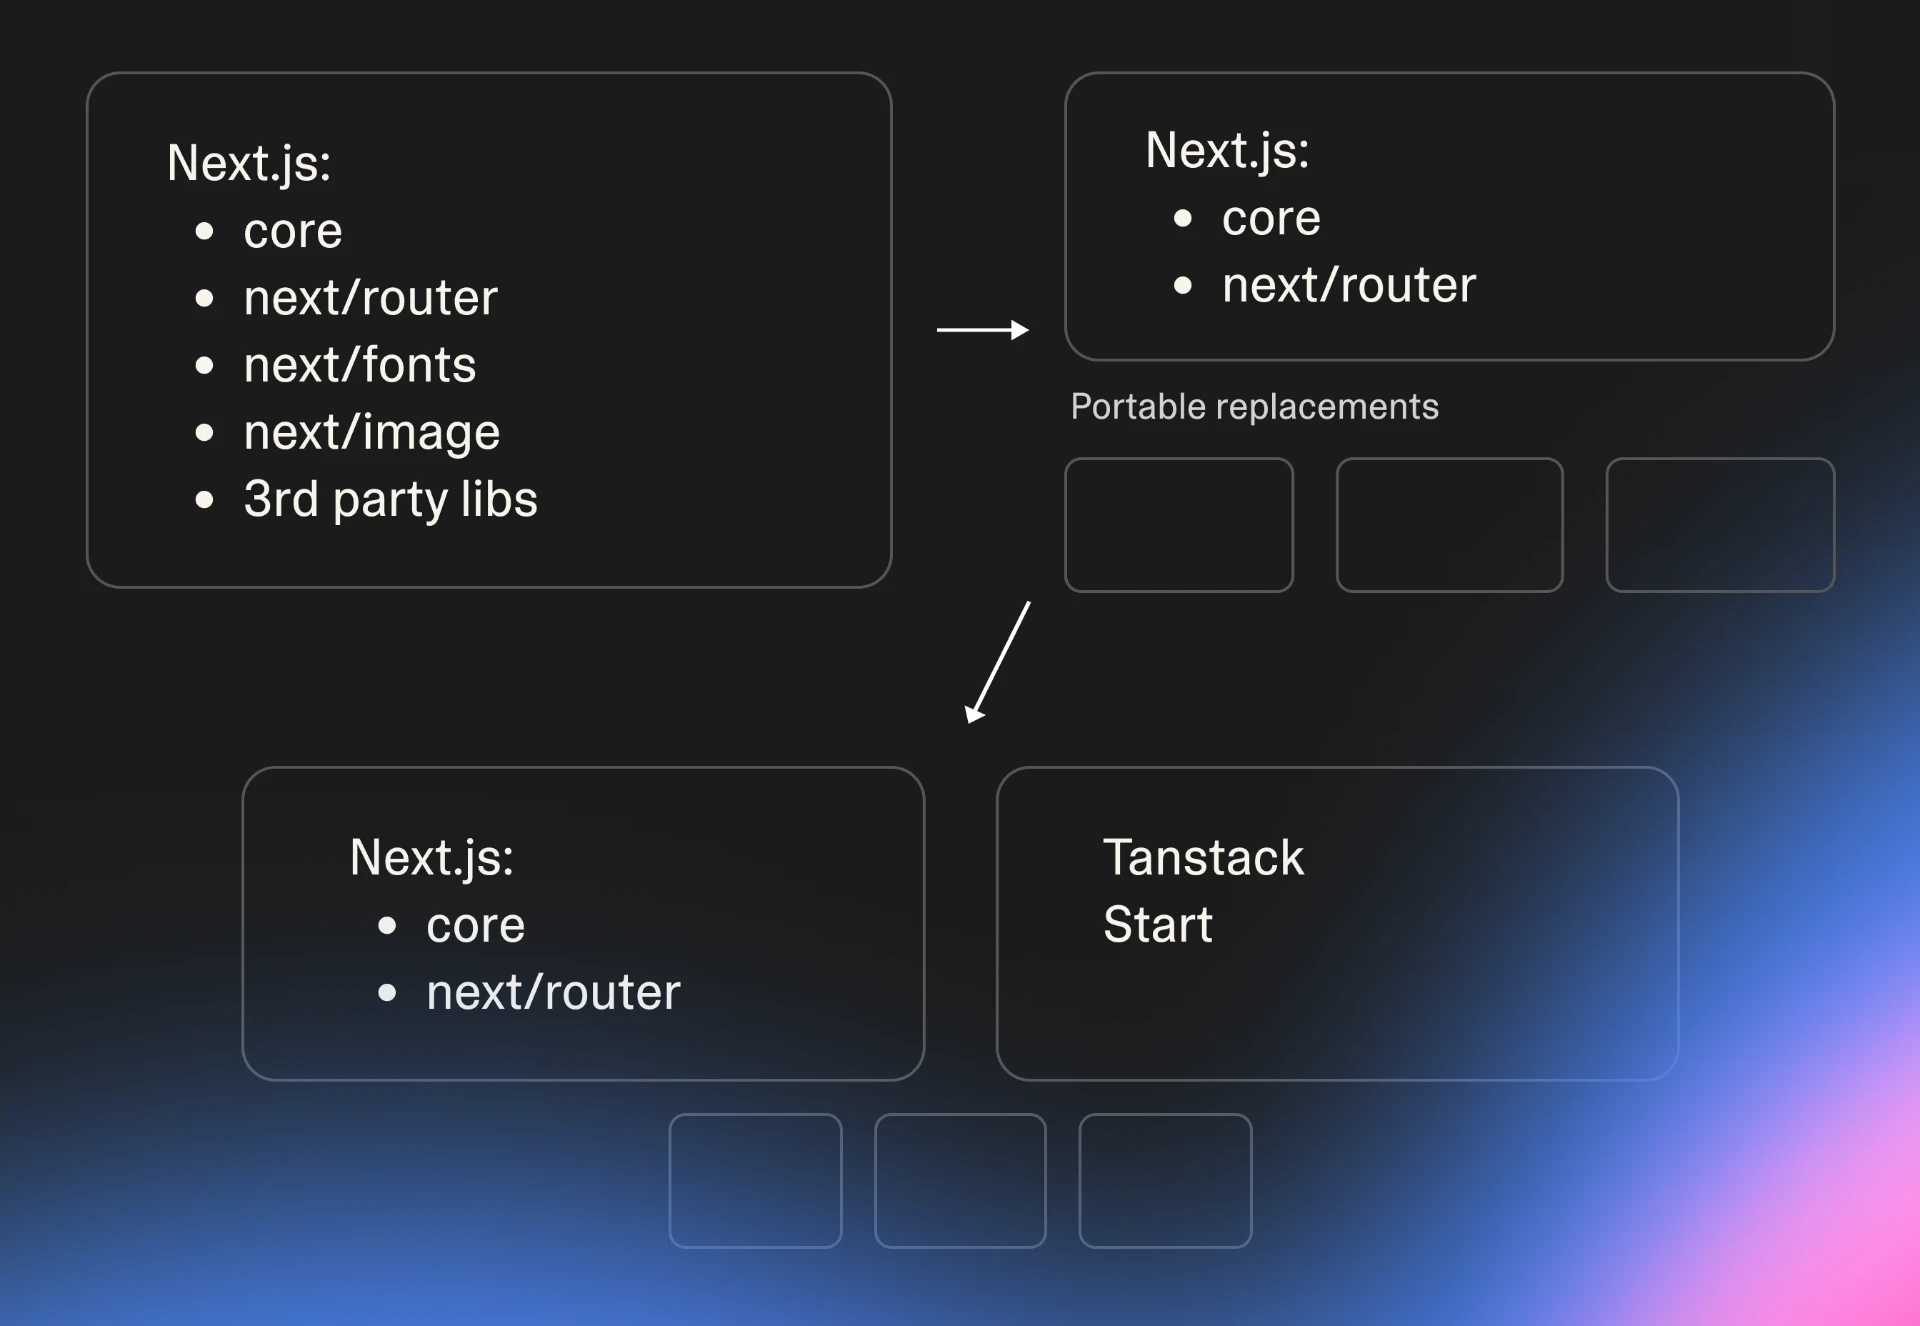
Three stages: a Next.js box listing core, next/router, next/fonts, next/image and third-party libs; then the same box reduced to core and next/router with portable replacements beside it; then Next.js and TanStack Start side by side over the same portable replacements.

Replacing framework APIs with portable equivalents first shrank the surface the migration had to cross.

AI-assisted code move

When I planned the migration, the original strategy was “let's build all the tools then distribute the bulk of the work across the teams who own and maintain product features”. It didn't survive contact with reality—in a good way. First it became “agents draft the PRs, owners review and test”. Then the drafts turned out to be good enough that I reviewed and landed them myself, batch after batch. In the end, no team ever received their share of the migration.

A few techniques naturally evolved as migration work went forward.

The first was a set of skills and agent knowledge that supported asking “Move component X to shared web code” and getting a production-ready PR back. When you expect to repeat some kind of work tens or hundreds of times, it pays off to extract the common reusable parts of your prompts—the same way you extract reusable code instead of copy-pasting it. This also greatly simplifies the human handoff. The first few times when I said to a colleague “ask your agent to migrate this component—it already knows how” and it actually worked, it felt like magic. You can save so much time on coordinating a big team effort when all you need to communicate to humans is a high-level overview and their agents can fill in required details as needed. In a few months I replaced the underlying web framework while the ever-growing development team was busy doing their work and people barely noticed—this felt amazing!

The second useful improvement was raising the level of abstraction for agentic planning. I started at the bottom of the ladder: low-level goals set and tracked by me, planning and implementation done by the agents. For example, when making sure we can show a project list fully in TanStack Start, I identified 21 React context providers that all needed to be migrated to shared code. Each provider was tracked as its own Linear ticket. Somewhere in the middle of migrating those providers I noticed how few interesting decisions each one actually needed. And all the boring stuff should go to AI as soon as I could figure out a good enough way to delegate it. The delegation ended up looking like a /goal loop applied one level up, to planning rather than implementation:

  1. Define a measurable migration metric (e.g. “How many agent tools still have a Next.js UI”) and write a script to measure it deterministically.
  2. Feed that to a planner agent to identify large enough batches of migration work: “identify coherent subset of the migration from the above that can be implemented as a PR stack, 12 PRs max, 800..1600 lines/PR preferred size”. Those batches are then handed off to implementation agents. I wrote more about the overall process in a post about scaling agent coding.
  3. Keep going until the metric reaches zero or there's a hard roadblock. Identify the next metric to bring you closer to the complete migration and repeat.

A third useful finding was migration-specific review automation that identified non-portable patterns in new code and told authors how things should be refactored instead. Every merged PR was analyzed by the agent to make sure it met compatibility requirements. Small fixes to existing features were exempt to reduce friction. Every new feature or big change that wasn't compatible triggered an alert to the author. The fix, as usual, was “tell your agent to make it compatible, it already knows how”. This way everyone knew just enough about making web code compatible and learned it at the right time. Thanks to this automation, we ended up having unusually few “oops, this has never been ported” surprises at the end of the migration.

So, in the end agents did a good enough job of migrating the code and verifying correctness. Agent-driven exploratory checks, smoke tests I ran myself and the staged rollout gave me enough confidence that I never needed to involve code owners at all. What would've been a multi-team coordination effort two years ago was done by a single developer and a pack of agents. The results of the migration usually passed smoke testing with a few small fix iterations. And things looked good enough to start serving real users with the TanStack Start version of lovable.dev.

Switching the traffic

Traffic was switched one route group at a time. We went through a multi-stage A/B rollout for every route group: limited internal testing → company-wide internal testing → 1% of users and then gradually all the way to 100%. For a big integrated system like ours it's effectively impossible to predict all its behavior analytically, so the main quality controls you have are a good feedback loop, the ability to roll back fast, and the ability to fix things quickly. For the first few route groups, internal testing took up to a week as we found and fixed all the post-migration issues. The duration was similar for external users—we had fewer issues, but we took more time to make sure we got proper signal from a small % rollout before moving further.

Having multiple ongoing rollouts in parallel can be confusing, so I made sure we only had one external rollout climbing from 1% to 100% at a time; the next one waited in the queue even if internal results showed it was ready to start. There was always some parallel work migrating further parts of the system, and therefore no rush to roll out. The last few groups took about a week end-to-end, and were boring in a good sense.
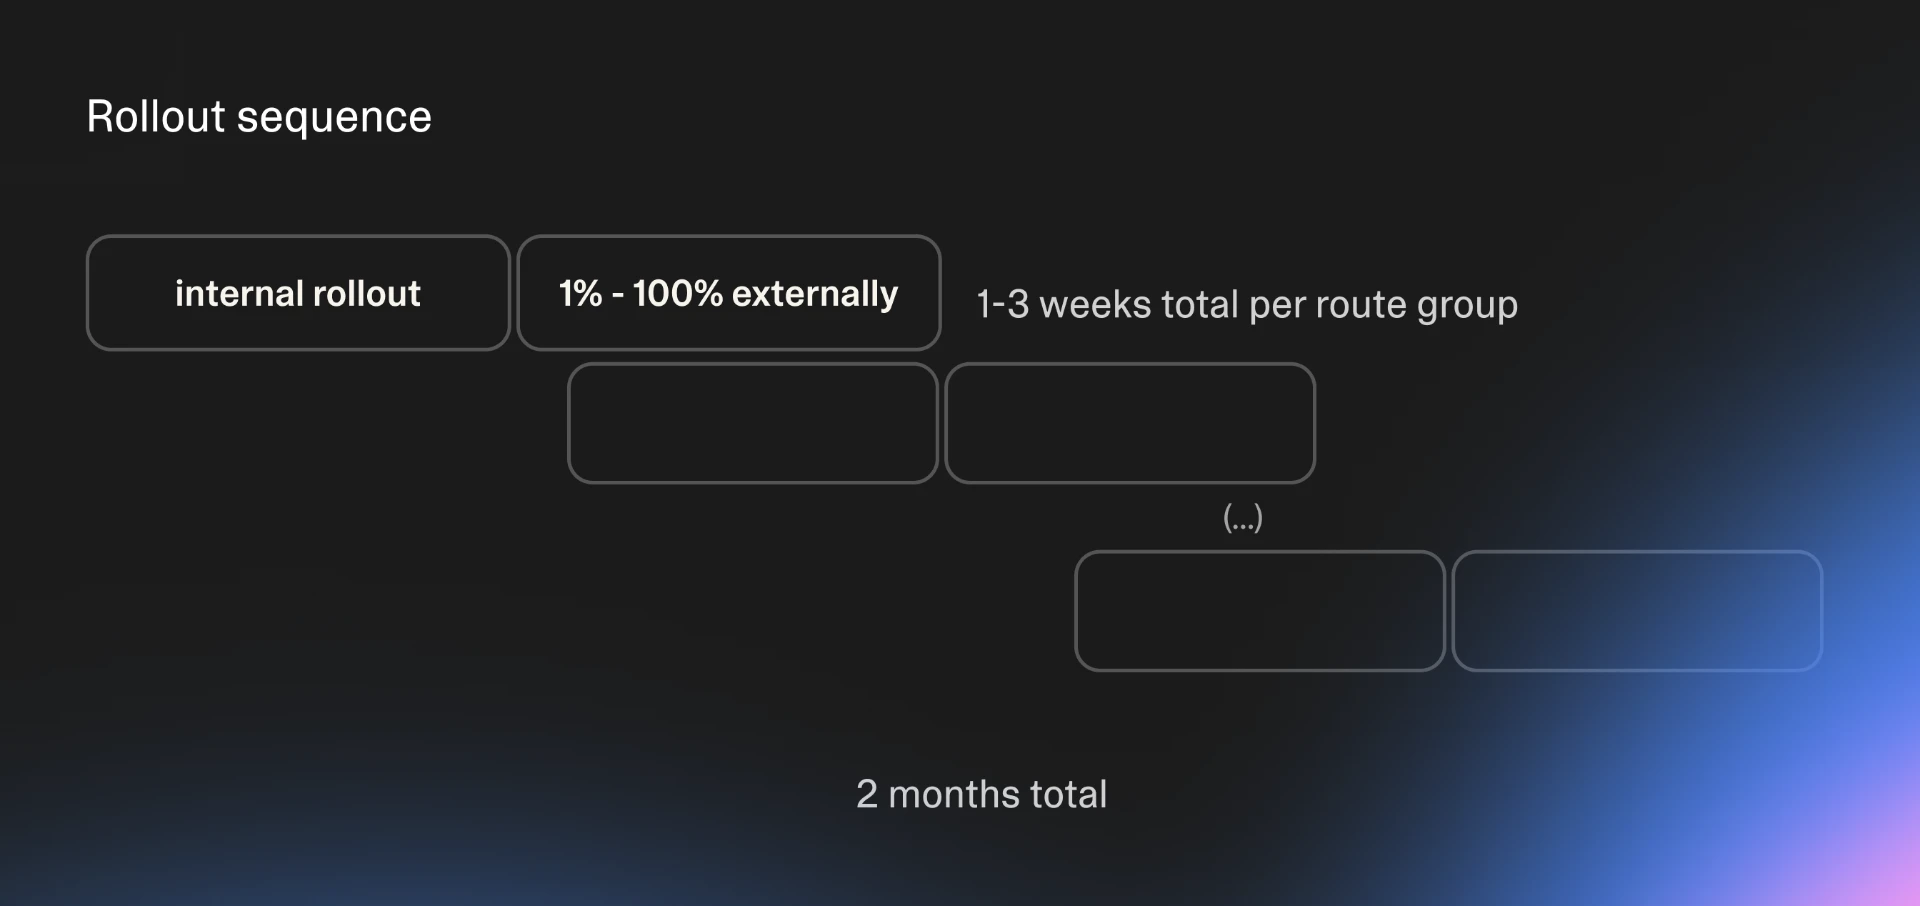
Staggered rollout timeline: each route group goes through an internal rollout then a 1% to 100% external rollout, taking one to three weeks per group and two months in total.

One external rollout climbing at a time, staggered across route groups—two months end to end.

When you're watching rollout logs, the most obvious failure modes are crashes and functional bugs. Less obvious but at least equally important is system performance. We monitored server response time, server error rates and web vitals, and tracked how frameworks compared with each other on each. We managed to identify and fix most of the performance issues before they affected a large share of users. Not all, though—and if I were doing it again I'd spend even more time on monitoring performance and be more aggressive about rolling back changes that look slow in the metrics.

One takeaway on performance optimization: you want to look at both synthetic metrics and the ones from real users. Synthetic metrics are less noisy and easy to integrate into an agentic loop, so optimizations are easier to make. And real user metrics are your ultimate target: they move slowly and are harder to influence directly, but they reflect the real state of the system for the users.

All in all the rollout took about two months, and most of it happened while still migrating code (only the last 2–3 weeks were solely about rollout with no migration work happening anymore). There's definitely a risk-vs-time tradeoff here, and I'm pretty happy with the relatively conservative approach we took on rollout. For the most part. In one case things went wrong spectacularly.

Out-of-memory incident

I had just finished the rollout of the biggest route group—it went smoothly, and I got more optimistic than I should have. The next route group was the dashboard: less code, less risk, but it sat on every authenticated user's journey. Internal rollout was uneventful, and I started slowly increasing the percentage in the public rollout. 1%. 5%. On Friday before lunch I set it to 20%. And in the afternoon complaints about performance started to arrive. And then our error rate went up—gradually, then suddenly. It moved from 0.1% to 0.5% at first. Then it went to around 50% in just a few minutes, and all the alerts we had went off.

The incident lasted 11 minutes. As is often the case, rolling back the commit that broke everything was much faster and easier than understanding why it had happened in the first place. Turns out we were living too close to the edge: in our case, the memory limit of our runtime environment. Migrating some static data JSON for the public website (a completely unrelated feature, hidden behind a flag that was turned off) pushed us over the limit. The few added MB became the last straw. The dashboard rollout increase was not the root cause, it just exposed more people to the problem at the worst possible time.

Why did it break? Remember, V8 isolates are supposed to be reused many, many times—ours were serving fewer than 10 requests on average before being killed for going over the memory limit. For comparison, our current baseline is 500–10K requests per isolate, mostly influenced by deployment frequency. And when an isolate is killed, every request it's currently processing errors out.

What did I do wrong here? Did not measure initial memory use. Ignored early warnings and accepted a 0.1% error rate as something we could figure out later, when the migration was over. In other words, too much optimism and too little looking at the actual data.

Once it was clear exactly what went wrong, the long-term fix looked like applying more AI to the problem. “Here's how to measure memory usage in server requests. Give me 10 ideas on how to reduce it. Prototype and measure. Apply each good one as a PR”. All you need is time, tokens and engineering taste to see which ideas are promising. And lately we're seeing zero out-of-memory errors on a median day.

Some examples of memory improvements that helped us there:

  • Don't parse multi-megabyte JSONs with static content at module level—those objects stay in server memory forever. Importing as raw strings and parsing in request handlers cut memory consumption between 2x and 12x depending on specific route.
  • Excluding unused fields from list APIs saved us a few MBs on templates—we have hundreds of them and catalog pages never needed full descriptions.
  • Replacing client-only code with empty stubs in the server bundle. Some parts of lovable.dev are essentially an IDE in the browser and most of that code wasn't needed server side. Excluding the TypeScript compiler, Prettier, the syntax highlighter and similar components saved us around 9MB in server bundle size, which translated to 18MB of worker memory. Bundle bytes count roughly double in memory: V8 uses a two-byte format for the whole string if it contains even one character outside of Latin-1. The whole bundle is loaded as a single string and our locale data guarantees that string has international characters in it. When your total limit is 128MB things like this start to count.

How TanStack Start compared to Next.js

Some personal reflections after using Next.js for many years and then migrating my largest project ever away from it.

Better local developer experience

TanStack Start uses Vite dev server, which starts faster and consumes several times less RAM compared to Next.js. On our codebase we're talking about the difference between 10s start / 1.5GB RAM on TanStack and 70s start / 8GB RAM for Next.js (numbers from my Macbook M4 Max, no other major workloads during measurement). And I've seen some frustrated colleagues reporting 20GB+ RAM from Next.js—not exactly what you want to see when you're trying to debug some backend service and don't need the local frontend all that much.

You never have enough RAM, even on the latest hardware, so low memory use is a breath of fresh air. And start time matters more when you switch between branches many times per hour.

That was on Next.js v16.2 with Turbopack enabled; the new v16.3 claims up to 90% reduction in memory usage for dev server.

Next.js abstractions still confuse me

Next.js was the first popular framework to tackle all the complex aspects of server/client isomorphism. No wonder it had to go through a few iterations before arriving at the current state. I've seen many developers, myself included, being confused by server components, server actions, layout vs page separation. Maybe it's a skill issue, but it's genuinely annoying.

TanStack Start builds on accumulated industry experience here and introduces fewer abstractions, which I find easier to understand. I don't see similar confusion with TanStack's server functions, route loaders and nested routes—they feel more intuitive.

My agents perform better with TanStack Start

I remember seeing obsolete and misguided advice from agents when dealing with tricky Next.js issues (trying to use page router API in app router, assuming caching defaults from v14 still apply in v16, etc.). Often the culprit was outdated internet knowledge, or the agent lost track of what the right solution looks like for the specific Next.js version we were running at the time. The fact that Next.js v12, v14 and v16 are so different from each other does not make it easy for the agents—many training sources aren't explicit about framework version, pages vs. app router, etc.

I feel that TanStack Start, being new, does not have this problem. My agents tend to get it right the first time; the mistakes I see aren't related to misunderstanding the framework. My read: for agents, a small but consistent training corpus beats a large one full of internal contradictions. An agent can fill a knowledge gap by reading the docs and the surrounding code, but it can't easily unlearn a confidently wrong habit.

For a large TanStack Start app you may need a lot of bundler configuration

Optimal code bundling feels like a mostly solved problem in Next.js. My production builds are usually efficient out of the box. The main optimization levers I was using were removing dependencies and adding bundle split points via next/dynamic.

TanStack Start, on the other hand, required quite a bit of low-level configuration to get good results. Agents understand this type of optimization well, but you still need to recognize the need and then set them to work. Our current build configuration for lovable.dev has 17 custom build plugins (custom code splitting, support of multiple custom development environments, assets pipeline, etc.). Your mileage may vary but don't expect to need zero configuration for an application of our scale.

What we got out of it

The main reason and the main payoff of the migration is the dogfooding. But we got a few other things on the side.

Performance

For our users, most web vitals are at parity. We got faster response times in general: -49% in median TTFB. But a slower long tail: we started with p90 up to 2x slower, and it took some work to bring it back (now -16% vs. the original). Client-side metrics did not change much, but I feel they are easier to optimize now.

For ourselves, we got faster build times both for local development and CI/CD. Our website's production build was often the slowest CI check—12+ minutes wasn't uncommon. Now it takes 6–9 minutes, and we haven't even done a single optimization pass yet: I found two more minutes to cut just while drafting this section. When your company deploys hundreds of times per day, every minute matters.

AI-assisted tooling

Handling that much code single-handedly forced me to push the envelope on the scale of AI coding. My colleagues and I still use the skills and tools I built for the migration in our day-to-day work.

Self-editing

One other nice consequence of using the same stack for lovable.dev and our users' apps is that it makes self-editing easier to support. We can now use Lovable to edit lovable.dev and preview changes in real time. This has become our main self-service editing flow for non-technical employees at Lovable—everyone is a builder and everyone can make Lovable itself better. Developers also use self-editing daily, but that story deserves its own post later.

What's next

Lovable has an opinionated tech stack—TanStack Start web applications. But our agents and infrastructure can already support a much wider spectrum. For development, we can run anything in our sandbox VMs. We want to use this capability to let anyone import and edit any existing software. So, don't be surprised if we let you import Next.js apps in the not-so-distant future. Ironic, considering we just migrated away from it—but ultimately we want to enable Lovable to help you edit any software.

Read the whole story
emrox
10 days ago
reply
Hamburg, Germany
Share this story
Delete

Browser De-Slop

1 Share

Modern browsers ship with an insane amount of bloatware.

You can point and click in the browser settings to disable most of it. Or, you can de-slop the browser by force using a policy file.

To get started, create a JSON file at the appropriate path for your distribution. Here’s a few that I’m aware of:

Allegedly, these policies are also supported on Windows via Group Policy and MacOS using plist files. I wouldn’t know, since I use a real operating system.

You should read the docs for each option to understand what it does. My configuration here does a few things:

{
  "policies": {
    "ExtensionSettings": {
      "uBlock0@raymondhill.net": {
        "install_url": "https://addons.mozilla.org/firefox/downloads/latest/ublock-origin/latest.xpi",
        "installation_mode": "force_installed"
      }
    },
    "3rdparty": {
      "Extensions": {
        "uBlock0@raymondhill.net": {
          "toOverwrite": {
            "filterLists": [
              "user-filters",
              "ublock-filters",
              "ublock-badware",
              "ublock-privacy",
              "ublock-quick-fixes",
              "ublock-unbreak",
              "easylist",
              "easyprivacy",
              "adguard-spyware-url",
              "urlhaus-1",
              "plowe-0",
              "fanboy-cookiemonster",
              "ublock-cookies-easylist",
              "fanboy-thirdparty_social",
              "ublock-annoyances"
            ]
          },
          "toAdd": {
            "trustedSiteDirectives": [
              "intranet.example.com"
            ]
          }
        }
      }
    },
    "UserMessaging": {
      "WhatsNew": false,
      "ExtensionRecommendations": false,
      "UrlbarInterventions": false,
      "SkipOnboarding": true
    },
    "OverridePostUpdatePage": "",
    "OverrideFirstRunPage": "",
    "EnableTrackingProtection": {
      "Value": false,
      "Cryptomining": false,
      "Fingerprinting": false,
      "Locked": false
    },
    "Cookies": {
      "Behavior": "reject-tracker-and-partition-foreign",
      "BehaviorPrivateBrowsing": "reject-tracker-and-partition-foreign"
    },
    "NoDefaultBookmarks": true,
    "DisablePocket": true,
    "DisableAppUpdate": true,
    "CaptivePortal": false,
    "Certificates": {
      "Install": [
        "/usr/local/share/certs/trusted/your-custom-root-ca.crt"
      ]
    },
    "DisableFeedbackCommands": true,
    "DisableFirefoxAccounts": true,
    "DisableFirefoxStudies": true,
    "DisableTelemetry": true,
    "DontCheckDefaultBrowser": true,
    "OfferToSaveLoginsDefault": false,
    "DNSOverHTTPS": {
      "Enabled": false
    },
    "SearchSuggestEnabled": false,
    "Homepage": {
      "URL": "about:home",
      "StartPage": "homepage"
    },
    "SearchEngines": {
      "Add": [
        {
          "Name": "ddg",
          "URLTemplate": "https://duckduckgo.com/?q={searchTerms}",
          "Method": "GET",
          "IconURL": "https://duckduckgo.com/favicon.ico",
          "Alias": "ddg",
          "Description": "DuckDuckGo",
          "SuggestURLTemplate": "https://duckduckgo.com/ac/?q={searchTerms}&type=list"
        }
      ],
      "Default": "ddg"
    },
    "FirefoxHome": {
      "Search": true,
      "TopSites": false,
      "SponsoredTopSites": false,
      "Highlights": false,
      "Pocket": false,
      "SponsoredPocket": false,
      "Snippets": false
    },
    "AIControls": {
      "Default": {
        "Value": "blocked",
        "Locked": true
      }
    },
    "ExtensionUpdate": true,
    "Preferences": {
      "dom.security.https_only_mode": {
        "Value": true,
        "Status": "locked"
      },
      "dom.push.connection.enabled": {
        "Value": false,
        "Status": "default"
      },
      "browser.urlbar.suggest.quicksuggest.nonsponsored": {
        "Value": false,
        "Status": "locked"
      },
      "browser.urlbar.suggest.quicksuggest.sponsored": {
        "Value": false,
        "Status": "locked"
      },
      "browser.toolbars.bookmarks.visibility": {
        "Value": "newtab",
        "Status": "default"
      },
      "browser.safebrowsing.malware.enabled": {
        "Value": false,
        "Status": "locked"
      },
      "browser.safebrowsing.phishing.enabled": {
        "Value": false,
        "Status": "locked"
      },
      "browser.safebrowsing.downloads.enabled": {
        "Value": false,
        "Status": "locked"
      },
      "browser.newtabpage.activity-stream.feeds.section.topstories": {
        "Value": false,
        "Status": "locked"
      },
      "browser.newtabpage.activity-stream.showSponsoredCheckboxes": {
        "Value": false,
        "Status": "locked"
      },
      "browser.newtabpage.activity-stream.widgets.system.weather.enabled": {
        "Value": false,
        "Status": "default"
      },
      "browser.urlbar.suggest.quicksuggest.all": {
        "Value": false,
        "Status": "locked"
      },
      "browser.tabs.groups.smart.userEnabled": {
        "Value": false,
        "Status": "default"
      },
      "signon.management.page.breach-alerts.enabled": {
        "Value": false,
        "Status": "locked"
      },
      "privacy.fingerprintingProtection.pbmode": {
        "Value": false,
        "Status": "default"
      },
      "signon.firefoxRelay.feature": {
        "Value": "disabled",
        "Status": "locked"
      }
    }
  }
}

You should read the docs for these settings to make sure they’re right for you. My configuration here does a few things:

Unfortunately, Chrome does not support adding custom certificate authorities via the policy file anymore (I resorted to some hacky automation that adds the certificate to the user’s ~/.pki/nssdb on first login).

{
  "AdvancedProtectionAllowed": false,
  "AlternateErrorPagesEnabled": false,
  "AutofillCreditCardEnabled": false,
  "BackgroundModeEnabled": false,
  "BlockThirdPartyCookies": true,
  "BrowserGuestModeEnabled": false,
  "BrowserLabsEnabled": false,
  "BrowserNetworkTimeQueriesEnabled": false,
  "BrowserSignin": 0,
  "CloudPrintProxyEnabled": false,
  "CloudReportingEnabled": false,
  "DefaultBrowserSettingEnabled": false,
  "DefaultCookiesSetting": 1,
  "DnsOverHttpsMode": "off",
  "EnableAuthNegotiatePort": true,
  "EnableMediaRouter": false,
  "MetricsReportingEnabled": false,
  "NetworkPredictionOptions": 2,
  "PasswordManagerEnabled": false,
  "PaymentMethodQueryEnabled": false,
  "PrivacySandboxAdMeasurementEnabled": false,
  "PrivacySandboxAdTopicsEnabled": false,
  "PrivacySandboxPromptEnabled": false,
  "PrivacySandboxSiteEnabledAdsEnabled": false,
  "PromotionalTabsEnabled": false,
  "SafeBrowsingProtectionLevel": 0,
  "SearchSuggestEnabled": false,
  "SyncDisabled": true,
  "TranslateEnabled": false,
  "UrlKeyedAnonymizedDataCollectionEnabled": false,
  "DefaultSearchProviderEnabled": true,
  "DefaultSearchProviderName": "DuckDuckGo",
  "DefaultSearchProviderImageURL": "https://duckduckgo.com/favicon.ico",
  "DefaultSearchProviderEncodings": ["UTF-8"],
  "DefaultSearchProviderSearchURL": "https://duckduckgo.com/?q={searchTerms}",
  "DefaultSearchProviderSuggestURL": "https://duckduckgo.com/ac/?q={searchTerms}&type=list",
  "DefaultSearchProviderNewTabURL": "https://duckduckgo.com/chrome_newtab",
  "ExtensionSettings": {
    "ddkjiahejlhfcafbddmgiahcphecmpfh": {
      "installation_mode": "force_installed",
      "update_url": "https://clients2.google.com/service/update2/crx"
    }
  },
  "3rdparty": {
    "extensions": {
      "ddkjiahejlhfcafbddmgiahcphecmpfh": {
        "disableFirstRunPage": true,
        "defaultFiltering": "complete",
        "noFiltering": [
          "intranet.example.com"
        ],
        "rulesets": [
          "+default",
          "+annoyances-cookies",
          "+annoyances-notifications",
          "+annoyances-others",
          "+annoyances-overlays",
          "+annoyances-social",
          "+annoyances-widgets",
          "+adguard-spyware-url"
        ]
      }
    }
  }
}
Read the whole story
emrox
11 days ago
reply
Hamburg, Germany
Share this story
Delete
Next Page of Stories